Calibration frames: darks, flats, bias, dark-flats, and when to skip them
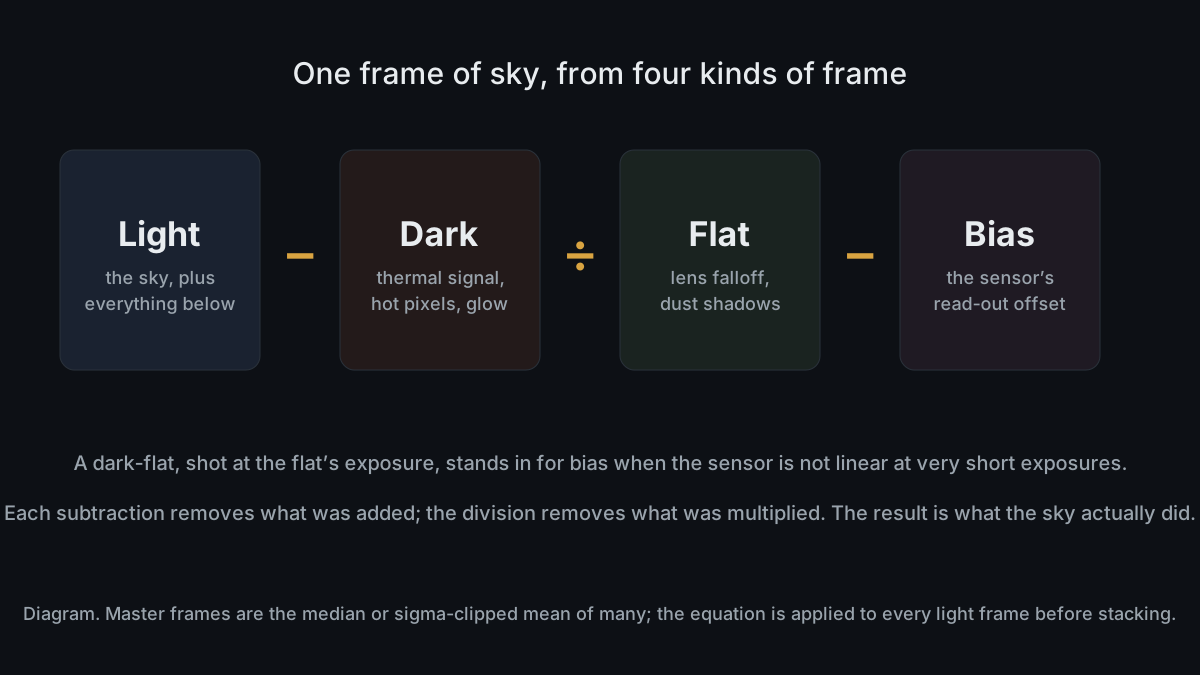
A finished astrophoto is several kinds of frame combined: lights of the sky, darks with the cap on at the same
exposure and ISO, flats of an even surface at the same focus, and bias or dark-flats to calibrate the flats. Each
removes one thing the sensor or lens added, and a star-trail night needs fewer of them than a deep-sky night does.
This page says what each frame records, how to shoot it so that it actually works, how many to take and why, the
arithmetic that combines them, and which of them your night needs at all. The numbers about the sensor are measured
on real frames — twenty-five bias frames from the same camera as the pictures — and the exposure rules
are computed from their published formulas, with the sources linked where each figure is stated.
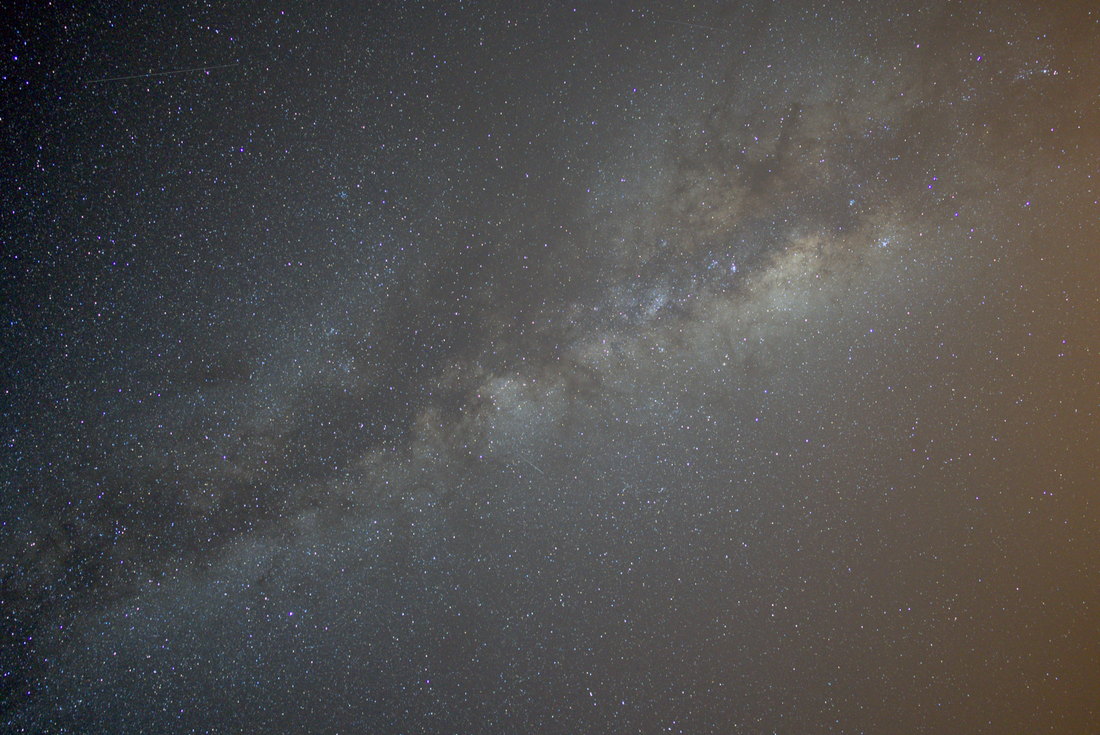
One light frame, as the camera wrote it: 24 mm, f/1.4, 20 s, ISO 5000, Tenerife, 15 August 2023. White balance
and the camera’s own colour matrix applied; no local editing. Everything the rest of this page describes
is a way of finding out what in this frame is sky and what is the camera.
1. Why one photograph is several frames
A camera does not record the sky. It records the sky plus everything the sensor and the lens add on the way: a
fixed offset every pixel reports even in total darkness, a slow accumulation of thermal signal that grows with
exposure and temperature, a scatter of pixels that are always too bright, a falloff toward the corners because the
lens delivers less light there, and the soft shadows of dust on the filter in front of the sensor. In a daytime
photograph these are invisible under the signal. At night, when the signal is a few photons per pixel, they are the
picture.
Calibration frames are photographs of those additions on their own, so they can be taken back out. A dark frame is
the sensor’s contribution with no light at all. A flat frame is the lens’s contribution, lit evenly. A
bias frame is the offset alone. Each one is shot so that it contains exactly one thing, and the arithmetic in section
8 removes each thing from every light frame before the frames are ever combined. The Calibration Lab on this site is
where that arithmetic happens; its own page describes what it does with the
frames once you have them. This page is about how to have them.
The whole page in one line. Diagram; the frames it names are described below, and the equation is written out
in section 8.
2. Lights
The light frames are the photographs of the sky — every one you meant to take. Everything about how to shoot
them well for star trails is on the field guide; for pinpoint stars
and the Milky Way, section 10 below gives the exposure rules and section 11 the lens. Three things matter here
because the calibration frames have to match them: the exposure time, the ISO,
and the physical state of the lens — focus, aperture, and how the camera is rotated. Write
them down, or leave the camera untouched until the calibration frames are done. A dark shot at a different ISO, or a
flat shot after the focus ring moved, is a frame that removes the wrong thing.
Shoot RAW. Every frame on this page is arithmetic on linear sensor counts, and a JPEG has already had a curve
applied, noise reduction run, and the offset stripped. The tool reads camera RAW for
exactly this reason; nothing below works on a JPEG.
3. Darks
A dark frame is an exposure with no light reaching the sensor: the lens cap on, the viewfinder covered, the same
exposure time and ISO as the lights, at the same sensor temperature. What it records is what the sensor generates
by itself in that time — the thermal signal that accumulates in every pixel, the hot pixels that accumulate
it far faster than their neighbours, and on some cameras a glow near an amplifier that brightens one edge or corner.
Subtracting a good dark from a light removes all three.
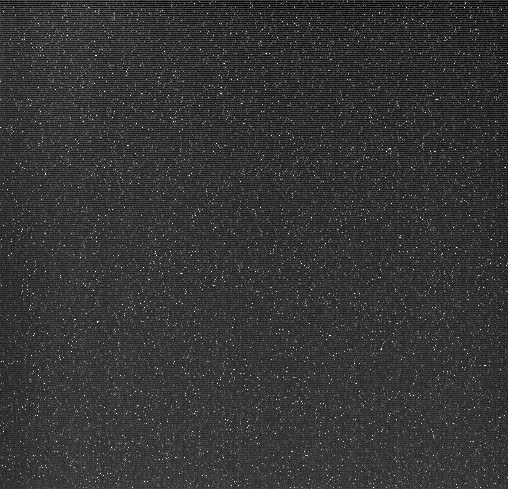
A real dark frame from an observatory CCD, exposed with the shutter closed under the same conditions as its light
frames. The bright points are hot pixels; every one of them would sit in the same place in every light frame.
“CCD Dark Frame” by H. Raab (User:Vesta), Johannes-Kepler-Observatory, Linz, adapted (recompressed),
via Wikimedia Commons, used under the
CC BY-SA 3.0 licensing option. This adaptation is
offered under the same licence.
How to shoot them
Same exposure, same ISO. Every source that discusses darks says this first and without exception. A 20-second light needs a 20-second dark at the same ISO. Thermal signal scales with time, and the offset and read noise change with ISO; a dark at any other setting subtracts the wrong amount.
Same temperature. Thermal signal rises steeply as the sensor warms — roughly doubling every five to seven degrees, by Clark’s measurements and most guides’ rule of thumb — so darks from a cold January night do not calibrate an August one. The safe habit is to shoot them in the same hour as the lights, in the field, at the start or the end of the session, so the sensor is at the temperature it was.
No light at all. Cap on the lens, and on a DSLR the eyepiece covered: light through the viewfinder reaches the sensor on some bodies. On a mirrorless camera with the cap on, the body is dark enough.
How many. Twenty to thirty is where nearly every source lands, and section 7 says why: the noise a master dark adds back falls with the square root of the count, so ten frames cut it to a third of one frame’s, twenty-five to a fifth. Fewer than eight makes a poor master.
What to switch off. Long-exposure noise reduction. It shoots a dark after every single light and subtracts it in-camera, which doubles the dead time between frames and, for a star-trail sequence, doubles the gap the trail has to bridge. One master dark from twenty frames does the same job better and costs nothing during the night. In-camera high-ISO noise reduction does not touch RAW and can stay as it is.
When not to shoot them
The how-to literature treats darks as mandatory. One careful measurement says otherwise for a specific class of
camera, and it is worth understanding because it is not a small effect. Subtracting a dark removes the sensor’s
pattern — the hot pixels and the glow, which are the same in every frame — but it also adds the
dark’s own random noise to every light frame. On a sensor whose thermal signal is already tiny, there
is little pattern to remove and the random noise added is a net loss.
Roger Clark measured the dark current of a Canon 7D Mark II at about 0.02 electrons per second and concluded that on such sensors subtracting a dark frame can add more noise than it removes.
His argument is at
clarkvision.com, and the stacking
comparison that goes with it is here.
No source in the how-to literature engages with the point; they simply do not mention it.
What to do with that: if your camera is a recent body with on-sensor dark-current suppression — most Canon and
Sony bodies of the last decade — test it. Stack one night with a master dark and once without, and look at the
background at 200 %. If the version without darks is cleaner, dither instead: nudge the framing slightly between
frames so that the hot pixels land on different sky and a sigma-clipped stack rejects them. If the version with darks
is cleaner, or you are stacking star trails, keep shooting darks. Section 9 explains why trails are the case where
darks still earn their place.
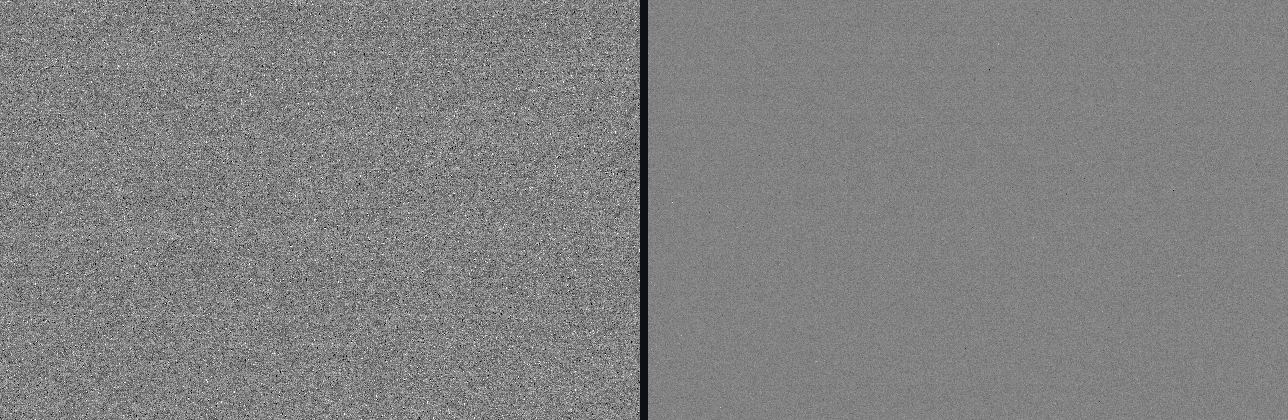
What subtraction does. The left half of this long exposure has had a dark frame subtracted; the right half is the
sensor’s raw output. The scene is snow rather than sky, which is why the hot pixels read so clearly.
“Dark frame subtraction” by Spigget, adapted (resized, recompressed), via
Wikimedia Commons, licensed under
CC BY-SA 4.0. This adaptation is offered under the same
licence.
Dark libraries
If your camera holds its sensor at a set temperature — a cooled astronomy camera does, a DSLR does not —
you can shoot darks once and reuse them for months at that temperature, exposure and gain. Sources disagree on how
long: some say every few weeks, some every three or four months, some every six. All agree a library is for cooled
cameras only; for a DSLR or mirrorless body in the field, the sensor’s temperature is the night’s, and
so are the darks.
4. Flats
A flat frame is a photograph of an evenly lit, featureless surface through the same lens at the same focus,
aperture and orientation as the lights. It records what the lens does to even light: darker corners, because a wide
lens delivers less light off-axis; and soft dark discs, the out-of-focus shadows of dust on the filter stack over
the sensor. Dividing every light by a good flat makes the sky the same brightness at the corner as at the centre and
erases the dust. For a deep-sky stack, where faint nebulosity is being recovered across the whole frame, this is the
difference between a picture and a picture with a bright hole in the middle.
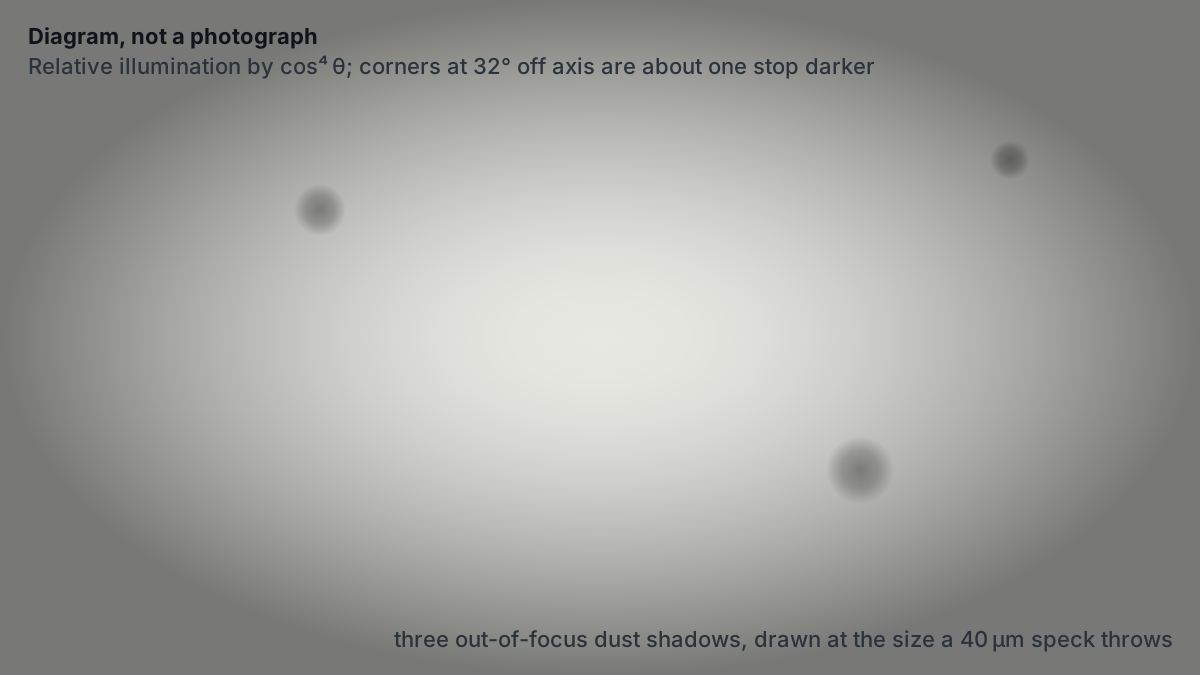
Diagram, not a photograph. The falloff is drawn from the cosine-fourth law for a corner 32°
off axis, about what a 24 mm lens sees on full frame; the dust shadows are drawn at the size a 40 µm
speck throws. No freely licensed photograph of a real flat could be found, and this site’s own lens has
never been given one — which is the honest reason the next figure exists.
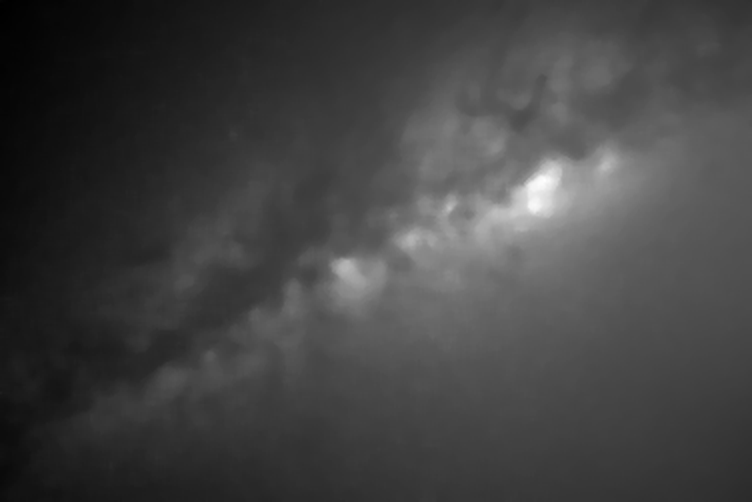
Why you cannot use the sky as a flat. This is the light frame at the top of the page with its stars removed by a
wide median: what is left is the Milky Way, a town’s glow in one corner, and somewhere underneath them the
lens’s own falloff. The corners differ from the centre by anything from a third of a stop to two stops
depending on which corner you read, and none of those numbers is the lens. Only an even source separates the lens
from the sky. That is the whole job of a flat.
How to shoot them
Touch nothing. Same lens, same focus, same aperture, and the camera rotated exactly as it was for the lights. Dust shadows move if the lens or the filter moves; the falloff changes with aperture and with focus. If any of these changed, the flat is for a different optical system than the lights.
An even source. Three that work: the twilight sky at dawn straight after the session, pointed away from the sunrise, with a white T-shirt or two layers of white cloth stretched over the lens to smooth it; a flat-field panel or an LED tracing panel held against the lens; a tablet or phone screen showing pure white, with a sheet of paper over it to kill the pixel grid. Point at nothing with structure.
The histogram. One hump, roughly a third to a half of the way across, touching neither edge. Sources put the target between 30 and 50 % of full scale, with 50 % the most named; one source says not above 80 %, which is a ceiling rather than a target. A figure in raw counts — “about 32,000 ADU” is often quoted — only means something for a 16-bit sensor, where 32,768 is exactly mid-scale; on a 14-bit RAW the same target is about 8,000. State the percentage, not the number.
Exposure. Whatever puts the hump there. Flats are usually short — a fraction of a second to a few seconds — and that is why they have their own calibration problem, in section 6.
How many. Twenty or more; they are quick, so there is no reason to take fewer than the darks.
When. The same session, or before anything about the optics changes. “The next day” is fine only if the camera has sat untouched with the lens on and the focus locked; it is not fine if you took the lens off to put it away.
5. Bias
A bias frame is the shortest exposure the camera can make, with the cap on, at the lights’ ISO. In the few
microseconds the shutter is open nothing thermal accumulates and no light arrives; what remains is the offset the
read-out electronics add to every pixel, plus the read noise around it. Every other frame — light, dark, flat
— contains this same offset. Bias is how the flats get it taken out; the darks, shot at the lights’ own
exposure, already contain it and take it out of the lights on their own.
Because bias depends on the read-out and not on time or temperature, it is the one calibration frame that keeps.
A master bias shot in July at ISO 320 calibrates flats in December at ISO 320. That is also why a bias frame is the
right thing to measure a camera with, and why the twenty-five below are the evidence for the rest of this page.
Twenty-five bias frames from the camera that took the pictures on this page: Sony A7C, 1/8000 s, ISO 320,
no lens. Left, one frame; right, the per-pixel median of all twenty-five. Both are the same 640×420-pixel
region of the sensor at 100 %, black-subtracted, stretched identically to ±4σ of the single
frame. What the median keeps is what is the same in every frame: a handful of fixed bright and dark pixels, which
is precisely what a master is for.
One bias frame from this camera has a read noise of 3.14 counts; the median of twenty-five has 0.80 and the mean 0.65, against 0.63 predicted by the square root of twenty-five.
Counts here are 14-bit sensor units after the black point of 512 is removed. The mean lands on the prediction
because read noise is random and averages exactly as the textbook says; the median is a little noisier than the
mean, which is the price of its refusing to be pulled by an outlier. Twenty-five frames took under a minute to
shoot.
The same single bias frame across the whole sensor, averaged in 8×8 blocks so that any large-scale structure
would stand out.
Pooled eight by eight across the whole sensor, one bias frame is flat to within a count: no gradient and no amplifier glow at this exposure.
On a camera with a glowing corner this is where you would see it. Not every sensor has one, and this one does
not at 1/8000 s; amplifier glow, where it exists, grows with exposure and lives in the darks.
How to shoot them
Shortest exposure, cap on, lights’ ISO. 1/4000 or 1/8000 on a mechanical shutter; the very shortest the camera offers.
How many. Fifty is common and a hundred is not unusual, because they cost seconds. Twenty-five did the job above.
Temperature does not matter, which is the opposite of darks, and is why the frames can be reused.
When bias is the wrong tool. Section 6.
6. Dark-flats
A dark-flat is a dark shot at the flat’s exposure and ISO: cap on, same fraction of a second the
flats used. It exists because of a quirk of some CMOS sensors: at the very short exposures a bias frame uses, the
sensor’s response is not quite linear, so a bias frame does not measure the offset that the flats actually
contain. A dark-flat, being shot at the flats’ own exposure, contains exactly what the flats contain apart
from the light, and calibrates them more faithfully. Several guides now recommend dark-flats over bias for any CMOS
camera, particularly when the flats run longer than about a second.
Two cautions. First, the term is used two ways: the majority of sources mean what this section means; at least one
widely read page uses “dark-flat” for ordinary darks matched to the lights, which is a different thing.
Second, “CMOS needs dark-flats” is a rule of thumb, not a law. The one source read for this page that
actually measured it, a
thread of working
photometrists, found the effect real and large on one camera and negligible on another at its short flat
exposures. If you want to know about yours, shoot both a master bias and a master dark-flat once and compare them:
if they agree to within a couple of counts, bias will do.
7. Master frames
You never subtract a single dark or divide by a single flat. You combine many of each into a master, and
the reason is the figure in section 5: each calibration frame carries its own random noise, and subtracting or
dividing by one frame stamps that noise onto every light. Averaging N frames reduces the random part by
√N while keeping the fixed part — the pattern you actually want to remove — intact.
Ten frames cut the added noise to about a third; twenty-five to a fifth; a hundred to a tenth. One source quantifies
the residual as roughly 10 % with three or four frames, 5 % with six to eight, and 1 % with twenty to
thirty, which is where every recommendation of “twenty or more” comes from.
The combining method matters less than the count, but not nothing. A plain mean is the most efficient at
reducing noise and the most vulnerable to a single odd frame. A median ignores odd frames and costs about a quarter
more noise, as the numbers above show. A sigma-clipped mean does both: it throws out values that are far from their
neighbours, then averages the rest. That is what the Calibration Lab does, and
why it refuses to sigma-clip fewer than eight frames: below that, the statistics
cannot tell an outlier from the noise.
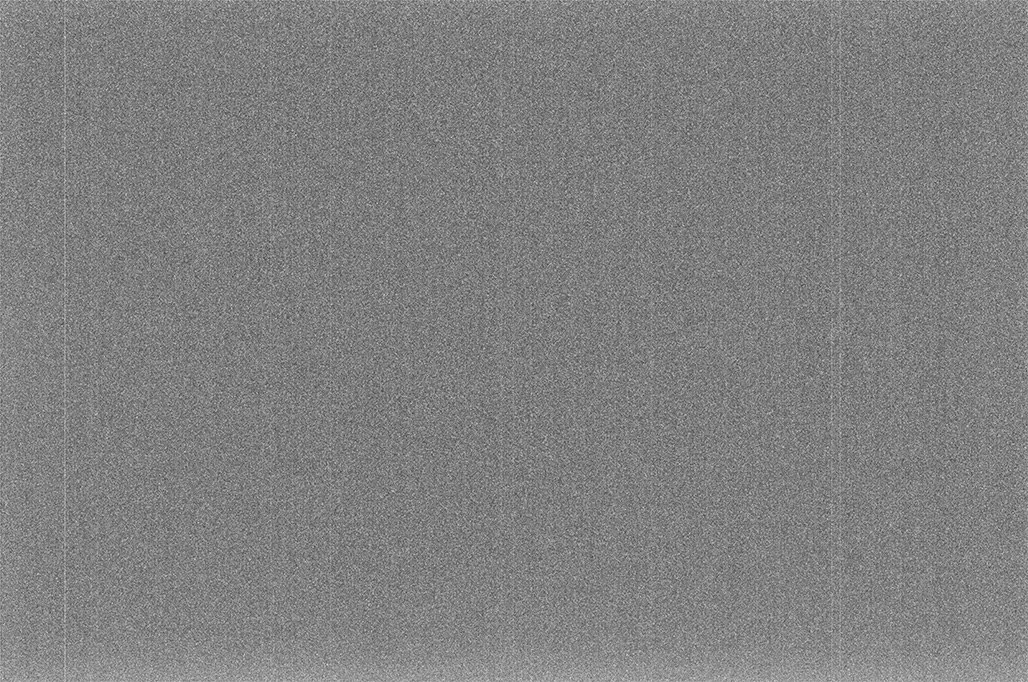
A master dark: eighteen frames from a Nikon D300 combined with a kappa-sigma clip, stretched hard to show the
pattern. The random grain of a single frame is gone; what remains is what the sensor does the same way every
time.
“Dark Frame” by Rawastrodata, adapted (recompressed), via
Wikimedia Commons, used under the
CC BY-SA 3.0 licensing option. This adaptation is
offered under the same licence.
with a master dark-flat in place of the master bias where section 6 applies, and the divisor normalised so that
dividing does not change the overall brightness. The subtraction on the left removes what the sensor added in the
dark; the subtraction on the right removes the same offset from the flat so that the flat is a picture of the
lens alone; the division removes what the lens did to even light. Because the dark was shot at the lights’
exposure it already contains the bias, so the bias is not subtracted from the light separately — doing so
would remove it twice. That is the way Siril’s
documentation writes it, and the way every serious stacker computes it; the differences between programs are
in how the masters are built and normalised, not in the equation.
The order is fixed and the calibration happens before any alignment or stacking. A frame that has been aligned has
had its pixels moved; a flat is a statement about pixels in their sensor positions.
9. Which frames a star-trail or nightscape night actually needs
Everything above is written, in the literature, for deep-sky stacking: many frames averaged so that faint,
extended structure emerges across the whole field. Star trails are combined the opposite way — the brightest
value at each pixel from any frame, a lighten blend — and a single nightscape frame is not combined at
all. No source read for this page addresses which calibration frames those two cases need. The arithmetic does.
Darks: yes, more than for a deep-sky stack
A lighten blend keeps every bright intruder perfectly, for the same reason it keeps the stars. A hot pixel sits in
the same place in every frame, so the finished trail picture is peppered with sharp fixed specks that no trail
runs through — one per hot pixel, in every frame, at full brightness. An average would have diluted them a
little; a maximum does not dilute anything. A master dark removes them before the blend. This is the case where
the “darks can add noise” argument of section 3 matters least: the blend takes the maximum, so the
random noise a dark adds is not integrated the way it is in an average.
Flats: rarely
The subject of a star trail is bright points on a dark ground, and vignetting hardly shows on a bright point. It
does show in the sky background, and if the picture is meant to keep an even sky it can be corrected afterwards
with a lens profile or a gradient, both of which are ordinary photo-editing steps. Dust shadows appear at small
apertures; at f/1.4 to f/2.8 they are invisible. Shoot flats for trails if you want to, but they are the frame you
can skip.
Bias: only if you shot flats
The bias exists to calibrate the flats. No flats, no bias.
A single nightscape frame
Subtracting a master dark from a single frame removes its hot pixels and adds a little random noise; on a modern
sensor the two roughly cancel and most photographers use the in-camera hot-pixel map or a click in the editor
instead. A flat for a single frame is a lens profile by another name, and the editor has one already. The
calibration workflow earns its keep when there are many frames to combine.
What this site accepts: the stacker’s star-trail, nightscape and deep-sky modes take optional matching RAW
darks, flats, bias and dark-flats alongside the lights, and the Calibration Lab
builds reusable masters from RAW groups and refuses to mix frames whose exposure, ISO or dimensions disagree. It
will tell you by name when a frame does not belong to the group.
10. How long each light can be
The sky moves 15.041 arcseconds a second at the celestial equator.
How many pixels that is depends on two numbers: how many arcseconds one pixel covers, which is the plate scale, and
how long the shutter is open. Plate scale is 206,265 times the pixel pitch divided by the focal length. Every
“rule” for the longest exposure before stars trail is an attempt to skip that arithmetic with one
constant.
Longest exposure before stars visibly trail, by rule, full frame, pixel pitch 5.97 µm (a 24-megapixel body)
Focal length
500 rule
600 rule
400 rule
NPF rule at f/2.8
Arcsec per pixel
Drift per second
14 mm
35.7 s
42.9 s
28.6 s
19.8 s
88.0″
0.17 px
16 mm
31.3 s
37.5 s
25.0 s
17.3 s
77.0″
0.20 px
20 mm
25.0 s
30.0 s
20.0 s
13.9 s
61.6″
0.24 px
24 mm
20.8 s
25.0 s
16.7 s
11.5 s
51.3″
0.29 px
35 mm
14.3 s
17.1 s
11.4 s
7.9 s
35.2″
0.43 px
50 mm
10.0 s
12.0 s
8.0 s
5.5 s
24.6″
0.61 px
Scroll the table sideways for the remaining columns.
The same rules on an APS-C sensor with a 1.5× crop, pixel pitch 3.92 µm (a 24-megapixel body); Canon’s 1.6× bodies come out about four percent shorter still
Focal length
500 rule
600 rule
400 rule
NPF rule at f/2.8
Arcsec per pixel
Drift per second
14 mm
23.8 s
28.6 s
19.0 s
15.4 s
57.8″
0.26 px
16 mm
20.8 s
25.0 s
16.7 s
13.5 s
50.5″
0.30 px
20 mm
16.7 s
20.0 s
13.3 s
10.8 s
40.4″
0.37 px
24 mm
13.9 s
16.7 s
11.1 s
9.0 s
33.7″
0.45 px
35 mm
9.5 s
11.4 s
7.6 s
6.2 s
23.1″
0.65 px
50 mm
6.7 s
8.0 s
5.3 s
4.3 s
16.2″
0.93 px
Scroll the table sideways for the remaining columns.
Computed from the rules’ published formulas: the 500, 600 and 400 rules as seconds = constant ÷
(focal length × crop factor), from
Scantips, which also gives the sidereal rate and shows the
600 rule costs about a quarter of a stop of sharpness for a quarter of a stop more light; the NPF rule as seconds =
(35 × f-number + 30 × pixel pitch in microns) ÷ focal length, from
Frédéric
Michaud’s formula as PetaPixel published it and as
AstroBackyard works it; plate scale from
Clarkvision. The inputs, outputs and formulas are in
this site’s receipt for the table, and two cells were checked against the sources’ own worked examples.
The 500 rule gives 20.8 seconds at 24 millimetres on full frame; the NPF rule at f/2.8 and a 5.97-micron pixel gives 11.5.
That gap is the whole argument about the rule: 500 was tuned for film grain, and a modern sensor resolves the
drift the film never saw. Which one you follow depends on what you will do with the frame. At a 100 % crop
or a large print, NPF is right and 500 leaves visible dashes. For a frame that will be viewed whole on a screen,
500 is a fine compromise, and for star trails you want the opposite of both —
the 500-rule page makes that case, and why the dash length depends on where in the
sky you point as well as how long you expose.
The frame at the top of this page is 24 mm at 20 seconds on a sensor with 50.79″ per pixel: the sky
moved 5.9 pixels during the exposure. That is invisible at page size and a short dash at 100 %, which is
exactly what the two rules disagree about.
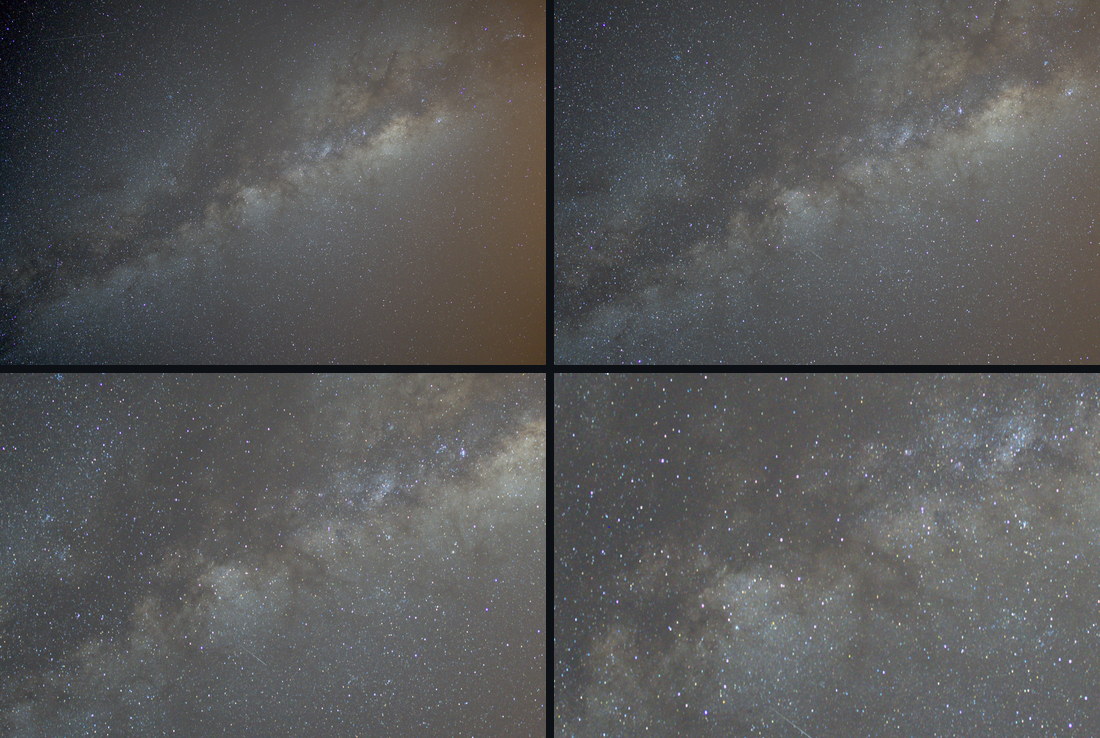
The same 20-second frame as four lenses would have framed it: 24 mm at top left, then the centre of the frame
at the field a 35 mm (top right), 50 mm (bottom left) and 85 mm (bottom right) lens would cover,
each scaled to the same width. Framing and the length of each star’s dash in proportion to the frame are
faithful — a longer lens really does this — but resolution and noise are not, because the crops are
enlarged. In proportion to the frame the 5.9-pixel dash becomes 8.6, 12.3 and 21.0 pixels: by 85 mm a
20-second exposure is a photograph of dashes. Untracked, the longer the lens, the shorter the frame; tracked, the
rules above stop applying and the exposure becomes a question of how well the mount follows.
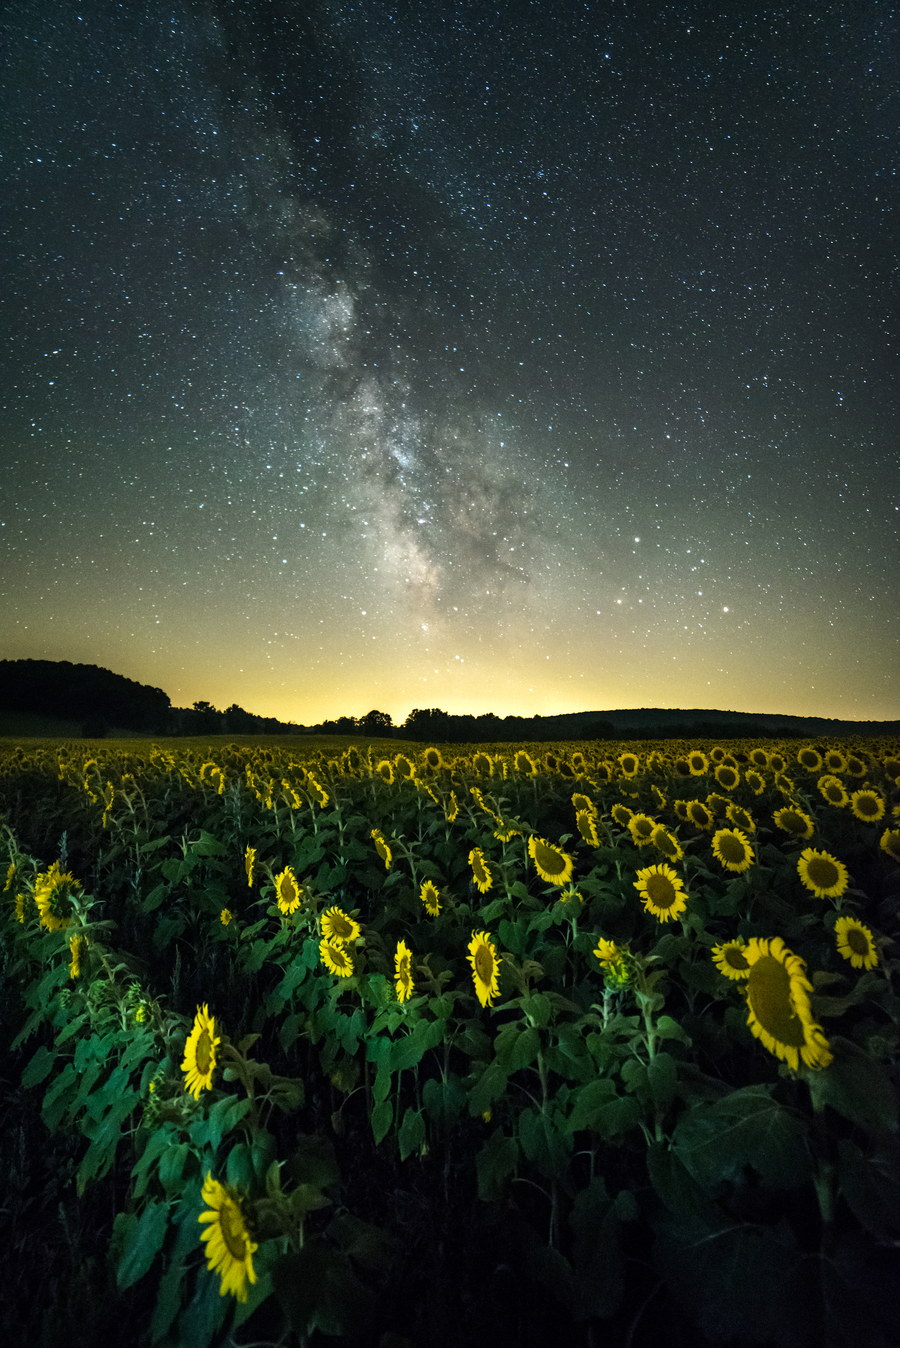
What 14 mm buys, from another photographer’s night: Nikon D750, 14 mm, f/2.8, 25 seconds, ISO 5000.
The whole core and a field of foreground fit in one frame, and at 88″ per pixel the 25 seconds moved the
stars 4.3 pixels — less than the 24 mm frame above moved in 20. A different camera, sky and night, so
only the framing and the arithmetic are comparable; both are exactly what the table predicts.
“Sunflower field Milky Way” by Juliancolton, adapted (resized, recompressed), via
Wikimedia Commons, licensed under
CC BY-SA 4.0. This adaptation is offered under the same
licence.
ISO, and the histogram
The exposure rules fix the shutter; the aperture is as wide as the lens allows; ISO is what is left. Two
independent analyses, Clark’s and
Lonely
Speck’s, arrive at the same place: ISO does not make the sensor more sensitive, it sets how the counts
are scaled before they are written, and the noise you see at high ISO is the shot noise of too few photons, not
something the ISO dial added. On many cameras the dial barely matters above a certain value; on some, the
high-ISO frame is genuinely cleaner in the dark. The practical advice across sources is a range of 1600 to 6400
and a target on the histogram rather than a number: the sky’s hump separated from the left edge, roughly a
quarter to a third of the way across. The frame at the top of this page is ISO 5000.
11. The lens, at the corners
Wide and fast: 14 to 24 mm at f/1.4 to f/2.8 is the consensus across every lens round-up read for this page,
for one reason, light. An f/1.4 lens gathers four times the light of an f/2.8 lens in the same exposure, which at
night is the difference between a Milky Way and a hint of one. The price is what fast wide lenses do to a star at
the edge of the frame.
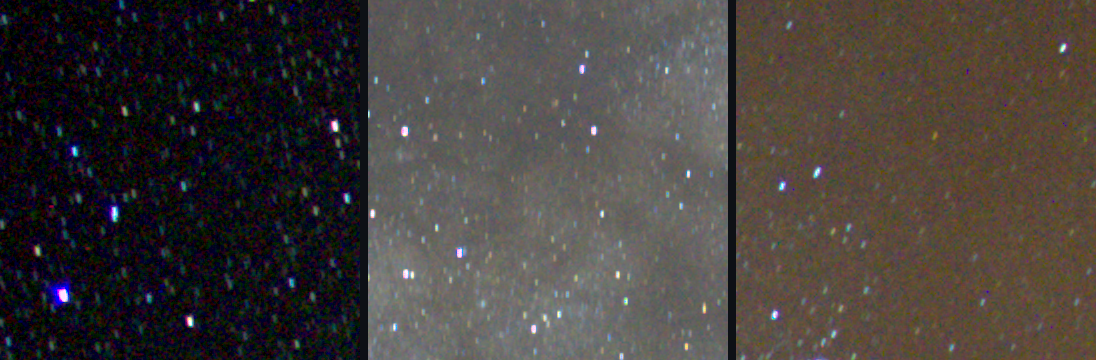
The frame at the top of the page at 100 %, at f/1.4: top-left corner, centre, top-right corner, identical
levels. In the centre the stars are round. In the corners each one is drawn out into a small wing pointing away
from the middle of the frame — coma and astigmatism, which every fast wide lens shows to some degree. This
is one of the best lenses of its kind; a cheaper one does this a good deal more.
Stopping down helps, and by how much is the one lens question where the tutorials genuinely disagree. One
widely cited test says coma only “sufficiently diminishes” by f/5.6 — two stops and more from
wide open, at which point you have thrown away the light you bought the lens for. Others, testing specific good
lenses, find one stop does it: a review of a 14 mm f/1.8 found coma gone by f/2.8, and a working nightscape
photographer’s notes recommend a third to a full stop on the lenses he actually uses. The honest answer is
that it is your lens’s number, not a rule’s: shoot the same star field at f/1.4, f/2 and f/2.8, look
at a corner at 100 %, and stop where you stop minding. The page on coma
explains what stacking can and cannot do about it, and the lens page shows what
published measurements say about yours.
Focus on a bright star with the live view magnified, not on the infinity mark, which on most lenses is a region
rather than a point and moves with temperature. Do it before the calibration frames, and do not touch it after.
12. Ten mistakes, and the sentence that prevents each
Darks at a different ISO or exposure from the lights. Set the camera, shoot the lights, put the cap on, shoot the darks, change nothing in between.
Flats after the focus moved or the lens came off. Flats first thing after the last light, with the lens exactly as it was.
Flats too bright. One hump a third to a half of the way across the histogram; if the right edge is touched, the flat is clipped and useless.
Too few frames. Twenty. The master is only as quiet as the square root of the count.
Long-exposure noise reduction left on. Off. It doubles the gaps and does the job worse than a master dark.
JPEG. RAW, for every frame including the calibration ones.
Subtracting bias from the lights as well as darks. The dark already contains the bias; removing it twice puts a negative offset in every pixel.
Reusing a dark library from another season on an uncooled camera. Darks are the night’s; only bias keeps.
Assuming a rule of thumb is your camera. Bias or dark-flat, darks or no darks, f/2 or f/2.8: each is a ten-minute test on your own body, and the answer is worth more than any page including this one.
Calibrating after aligning. Calibration is a statement about sensor positions; do it first, always.
13. Where the tutorials disagree
Fifty-six sources were read for this page and its sister on shooting, and on most of it they agree. These are the
places they do not, with both sides named, so that when you meet one of them in another guide you know which
argument you are reading.
Six calibration questions on which published guides give different answers
Question
One side
The other
What decides it
Are darks necessary on a modern sensor?
Every how-to guide: yes, always, twenty or more
Clark, and a quoted measurement by Craig Stark on a low-dark-current CCD: subtraction can add more noise than it removes
Your sensor’s dark current; test with and without
Scale darks to a different exposure, or match exactly?
Match exactly, especially on CMOS: Siril, most guides, the AAVSO manual
Scaled darks plus bias tested identical on one CMOS camera in a 352-image photometric comparison
Camera-specific; matching is always safe
Bias or dark-flats for calibrating flats?
Bias is fine on CCDs with stable short exposures
Dark-flats on CMOS, especially for flats over a second
Measure both once; the one thread with data found it varied by camera
How bright a flat?
Around 51 %, give or take five
Anywhere from 30 to 70 %; “not above 80”
The overlap, 30 to 50 %, works everywhere; state it as a percentage
What does “dark-flat” mean?
A dark at the flat’s exposure, replacing bias (most sources)
An ordinary matched dark for the lights (one encyclopaedia article)
Use the majority meaning; this page does
Do star trails need calibration at all?
Optional, a refinement (the tools that stack them)
Recommended without qualification (guides written for deep sky)
Section 9: darks yes, flats rarely, bias only with flats
Scroll the table sideways for the remaining columns.
Four exposure questions on which they differ
Question
One side
The other
What decides it
500 rule or NPF?
NPF; 500 is “very inaccurate today” and gives twice the exposure
500 is adequate for frames viewed whole; NPF was written for pixel-peeped nightscapes
How the frame will be viewed
The 600 rule
Wrong: you will get a small trail
A quantified compromise: a quarter-stop more light for a quarter-stop of softness
Whether you accept the trade knowingly
ISO: high, invariant, or low for colour?
High ISO adds no noise and on some bodies removes it
Keep under 1600 or lose star colour
Different goals: noise versus saturated star colour
Wide open or stopped down?
Manufacturers: shoot wide open, coma is controlled
Stop to f/5.6 before coma sufficiently diminishes (one test); one stop is enough on a good lens (another)
Your lens, at a corner, at 100 %
Scroll the table sideways for the remaining columns.
If you only remember five things
Darks match the lights in exposure, ISO and temperature, cap on, twenty of them, shot the same hour.
Flats are shot through the untouched lens of an even source, one hump a third to a half across the histogram, twenty of them, before anything moves.
Bias is the shortest exposure with the cap on at the lights’ ISO; it calibrates the flats, it keeps for months, and a dark-flat replaces it if your camera’s short exposures are not linear.
Masters, never single frames: the noise a calibration frame adds falls with the square root of how many you combined.
For star trails, darks matter more than for anything else, because a lighten blend keeps every hot pixel at full brightness; flats you can skip; bias without flats is nothing.
Calibration frame questions
Do I need dark frames with a modern camera?
Usually for a stack, not always. Darks remove hot pixels and thermal signal, and a lighten-blend star trail keeps every hot pixel perfectly, so they help there. On a sensor with on-chip dark-current suppression, subtracting darks can add more random noise than the pattern it removes; test your own camera with and without.
How many darks, flats and bias frames should I take?
Twenty to thirty of each is where the returns flatten: the noise a master adds falls with the square root of the count, so ten frames cut it to a third, twenty-five to a fifth. Bias frames are cheap and fifty is common. Fewer than eight of anything is a poor master.
Do darks have to be the same temperature as the lights?
Yes, within a few degrees, and at the same exposure and ISO. Thermal signal rises steeply with sensor temperature, so a dark library only works for a cooled camera that holds a set point. Shoot darks in the field, in the same hour, with the cap on.
What should the histogram of a flat frame look like?
One hump roughly a third to half of the way across, never touching either edge. Sources put the target between 30 and 50 percent of full scale; a raw-count figure only means something at a stated bit depth. Keep the focus, aperture and camera rotation exactly as they were for the lights.
Can I reuse bias frames from another night?
Yes, at the same ISO. Bias records the sensor’s read-out offset, which does not depend on temperature or exposure, so a master bias keeps for months. Darks do not travel like that.
What is a dark-flat, and when do I need one instead of bias?
A dark shot at the flat’s own exposure and ISO. Some CMOS sensors are not linear at the very short exposures a bias frame uses, so a dark-flat calibrates the flats more faithfully, especially for flats longer than about a second. It is camera-specific: test, rather than assume.
Does a star-trail stack need calibration frames at all?
Darks help, flats rarely matter, bias is pointless without flats. A lighten blend keeps the brightest value at every pixel, and a hot pixel sits in the same place in every frame, so the finished trail picture is peppered with sharp fixed specks that no trail runs through; a master dark removes them. Vignetting hardly shows on bright point subjects and can be corrected afterwards.
Can I shoot flats the next day?
Only if nothing has moved: same lens, same focus, same aperture, same camera rotation, no lens change in between. Any of those invalidates the flat. Sky flats at dawn straight after the session are the safe habit.