How to photograph star trails, and what the tutorials disagree about
Put the camera on a tripod, shoot short exposures back to back with the smallest gap the camera allows, and stack them afterwards; the sky turns 15.041° an hour, so a two-hour sequence draws a 30° arc whatever else you change. Everything after that first sentence is detail, and this page gives the detail twice over: what twenty-four published guides recommend, and what one real night measured on our own files actually did.
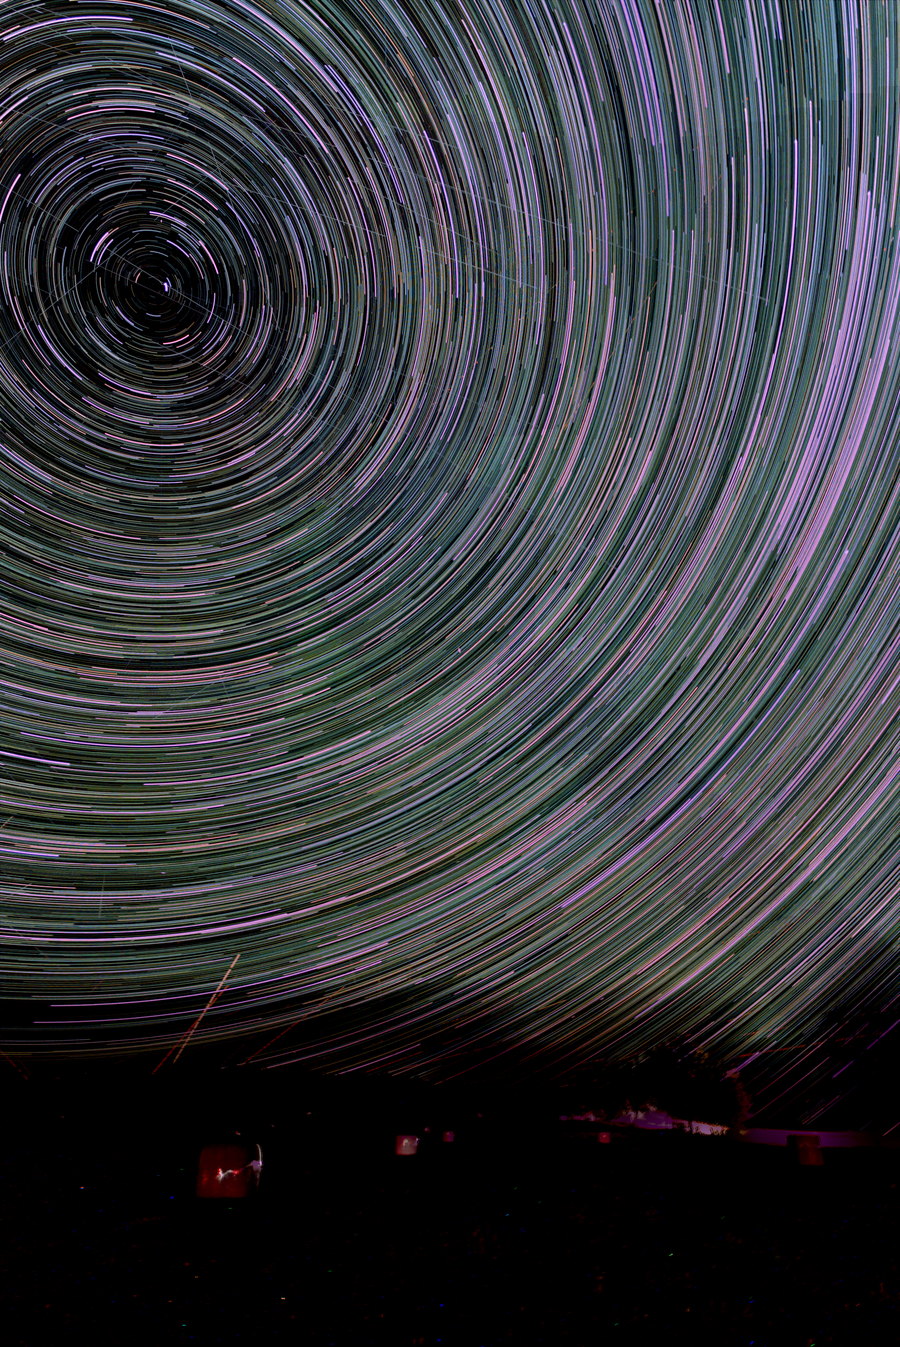
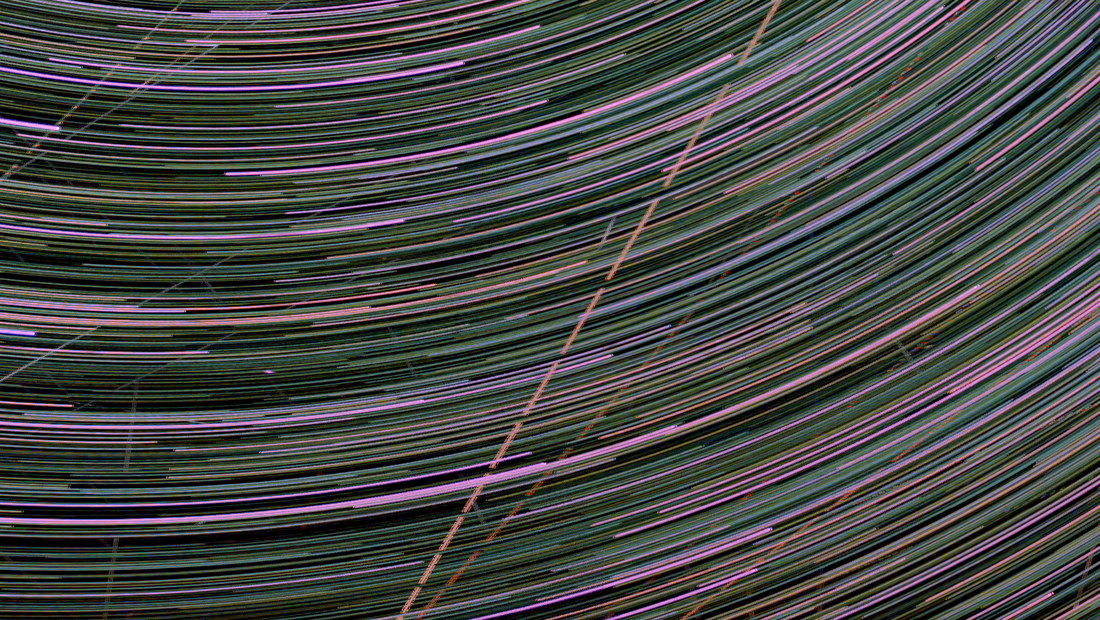
380 frames, 95 minutes of open shutter across a 116-minute session, Sony A7C and a 24 mm lens at
f/1.6, ISO 5000, 15 seconds each. This is the file the stacker produced, resized for the web and
otherwise untouched — see what was not done to it.
Two things to know before you read on
The pictures here are not retouched. They are what came out of a stacker, resized. They
are not the most beautiful star trails on the internet and they are not trying to be. A great deal of what
you have seen elsewhere is composited, colour-graded, or has a foreground photographed at a different time
of day. That is a legitimate craft and this is a different one: showing the picture the process actually
makes so the numbers around it mean something.
Where the tutorials disagree, this page says so rather than picking one and sounding
confident. Six real contradictions run through the published advice, and
the table at the end names each one with the sources on both sides.
1. What a star trail is, in one minute
The stars are not moving. You are, with the ground, once every sidereal day — 23 hours 56 minutes and
4 seconds. That works out at 15.041 degrees per hour, and it is the only number in star-trail
photography that nothing you own can change. Point a fixed camera at the sky, leave the shutter open, and
every star draws an arc that long.
So arc length is a question about elapsed time, not about exposure, aperture or ISO. This is the
single most useful thing to internalise, because it decides how long you are standing in a field.
How far the sky turns while you wait
Time on site
Arc drawn
What it looks like
Frames at 30 s
15 minutes
3.8°
Short dashes. Reads as a mistake, not a picture.
~30
30 minutes
7.5°
Clearly deliberate. The usual minimum anyone publishes.
~60
1 hour
15.0°
The common floor. Arcs are obvious; circles are not yet closed.
~120
2 hours
30.1°
A twelfth of a circle. Most published tutorials aim here.
~240
4 hours
60.2°
A sixth of a circle. Long, confident sweeps.
~480
8 hours
120.3°
A third of a circle. A whole winter night.
~960
The frame counts assume no gap between exposures, which is never quite true. Our own example night below ran
at 81 % duty cycle and still produced continuous arcs; see the duty-cycle number.
2. Before you go: where, and when
How dark does it actually need to be?
Less dark than for the Milky Way, and this is good news. A star trail is built out of the brightest stars in
the sky, and those survive a raised background that would erase faint nebulosity entirely. A stack that
equalises each frame's sky before combining also fights the glow directly. You will get more stars and better
colour from a darker site, but a Bortle 4 rural field is a perfectly good place to learn.
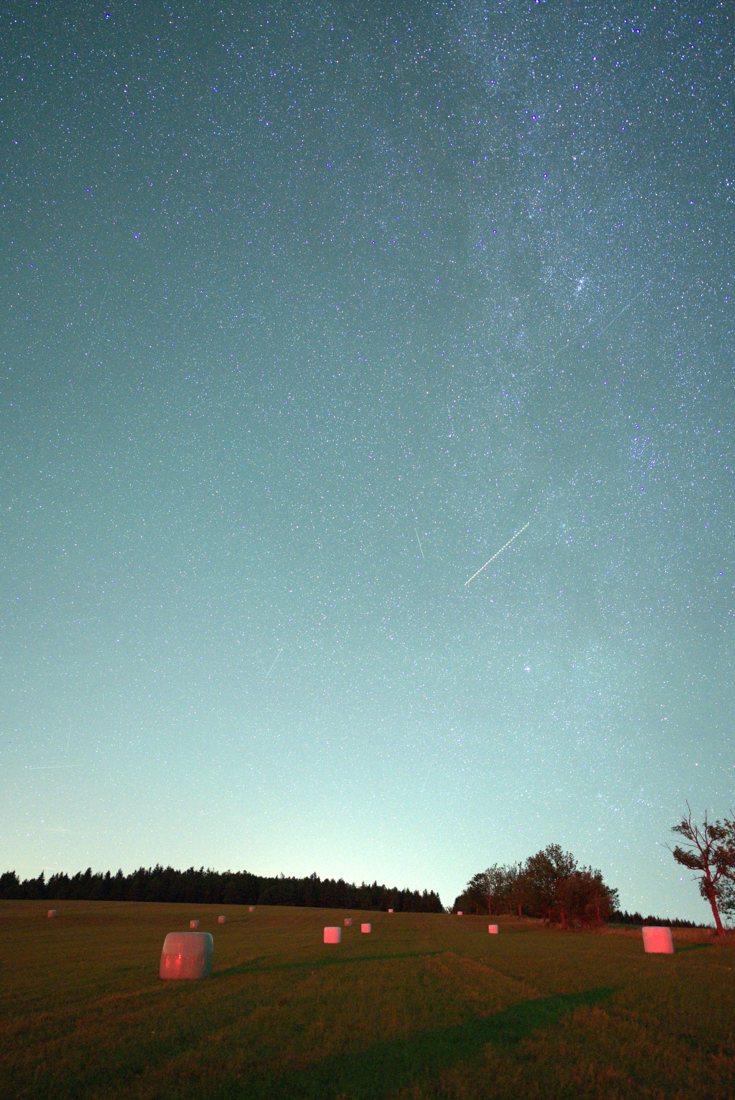
Roughly Bortle 4, a rural European field — the sort of sky most people can actually reach. The
background is lifted and coloured by distant towns, and there are already artificial trails crossing it.
Star trails work here.
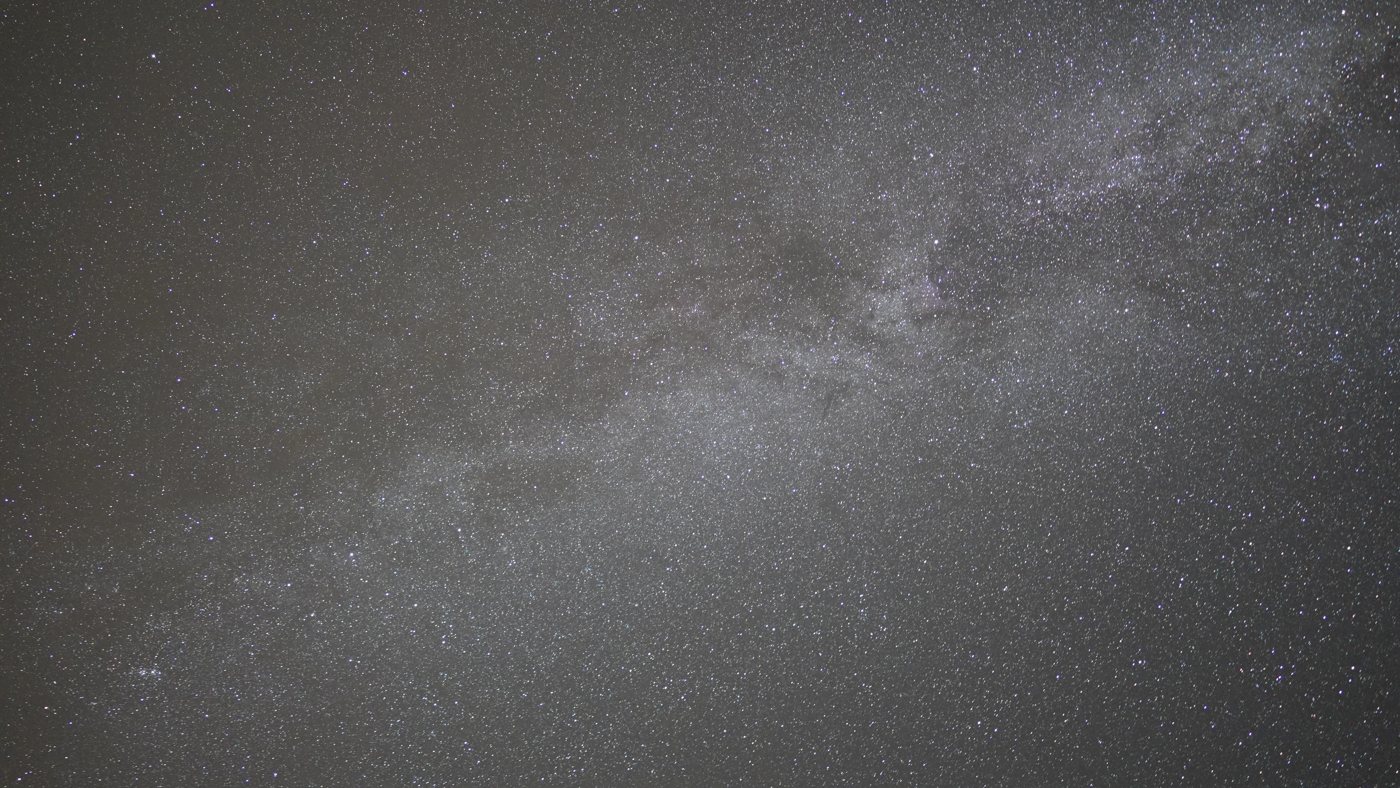
The same photographer, roughly Bortle 2, on Tenerife. Every star in the frame above is still in this
one; there are simply thousands more of them, because the background they sit against is far darker. That
difference matters enormously for the Milky Way and much less for star trails, which are made from the
bright end. What light pollution actually does to a frame takes the pair
apart.
VIIRS satellite radiance, a modelled zenith sky-brightness layer, and crowd-sourced meter readings. Note that SQM and SQM-L readings are not directly comparable, so the pins mix two instruments.
Both celestial poles, the horizon and the arcs your exposure and sequence will actually draw, projected on your own camera and lens for a location and time you type in yourself.
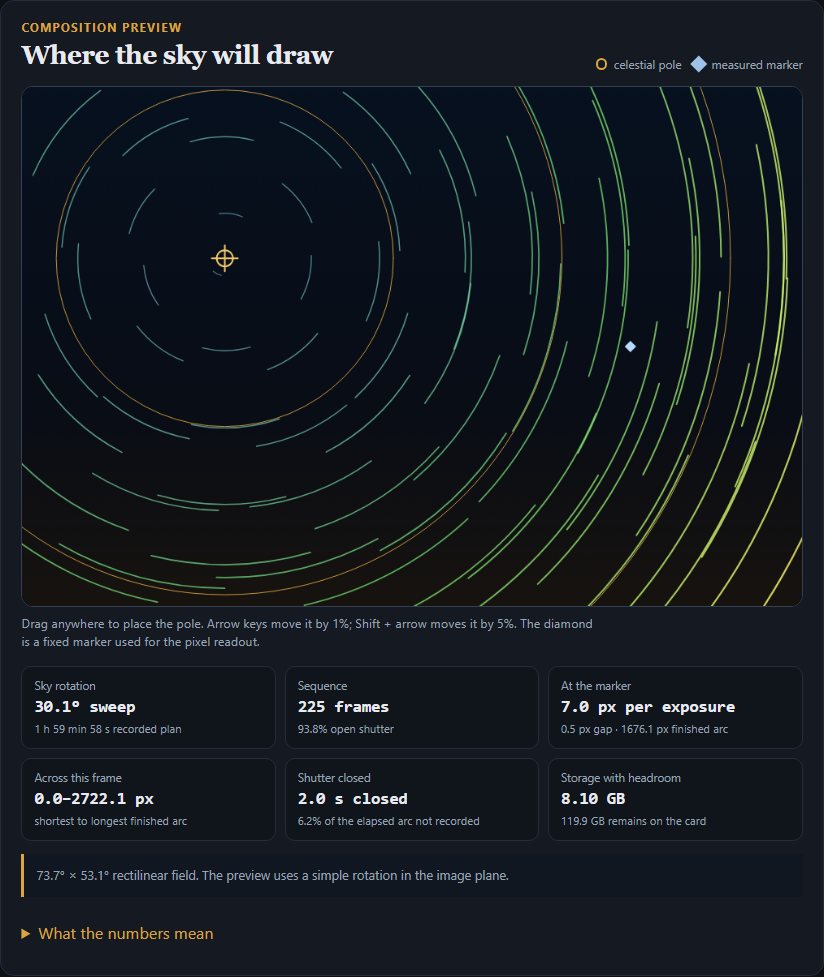
Trail length at different places in the frame, the gap in pixels, the frame count and the storage the sequence will need.
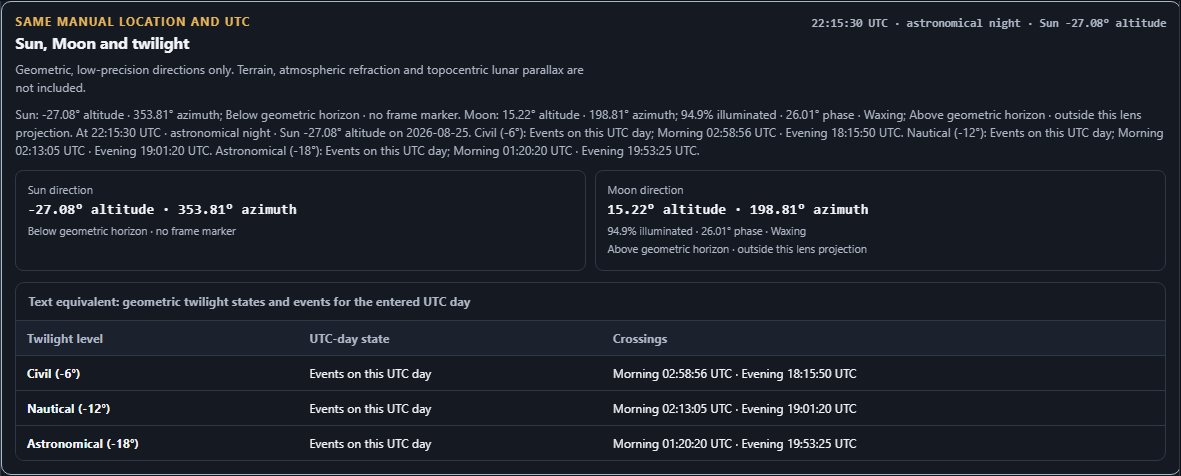
Sky Director, showing where the Sun and Moon actually are for a location and time you enter by hand. The
boundary that matters is astronomical twilight: north of about 49° it never arrives at midsummer, so there
is no true darkness to shoot in whatever the cloud forecast says.
Star Trail Planner. Place the pole where you intend it in the frame and it reports how long the trails
will be at different places in that frame, how big the gap between frames will be in pixels, how many
exposures the session needs and how much card that is. Cheaper to find out here than at 02:00.
The Moon is a setting, not an obstacle
A bright Moon washes out faint stars, and it also lights your foreground for free. Both are true, and which
one matters depends on the picture you want. A new Moon gives the most stars and a black foreground you will
have to light yourself. A quarter Moon low in the sky gives fewer stars and a landscape that looks like a
landscape. What actually counts is the Moon's altitude during your sequence, not the phase printed
on a calendar: a full Moon below the horizon is no Moon at all.
Season, and the trap at high latitude
Winter nights are long, cold and often clear, and cold air holds less moisture. Summer nights are short, and
above about 49° of latitude midsummer contains no astronomical darkness at all — that threshold runs
through Paris and Vancouver, so it catches far more people than they expect. The window widens quickly with
latitude: around 52° it lasts roughly two months, and at 60° about four. Anyone in Britain, Scandinavia,
Canada or southern Patagonia should check for real darkness before planning a summer night, because the sky
can simply refuse.
The free half of the satellite problem
Satellites shine by reflected sunlight, so they are only visible while you are in darkness and they, several
hundred kilometres up, are not. That geometry holds for roughly the first and last couple of hours of the
night, and around local midnight most low-orbit satellites are inside the Earth's shadow and go dark. A
survey of Zwicky Transient Facility images found that 64 per cent of Starlink trails were recorded during
twilight, and about 70 per cent of them below 40° of elevation
(Mróz et al., 2022).
The practical version: start an hour later than you were going to, and point away from the
horizon. That throws away most of your satellite passes and costs nothing. It is the least-repeated useful
advice in the whole subject.
3. What to carry
The kit, in order of how much it decides the outcome
Item
Why it matters
What people get wrong
A tripod that will not move for two hours
Every frame must land on the same pixels. A shift of a few pixels halfway through turns one set of arcs into two.
Raising the centre column. Keep it down. In wind, add weight low and rigidly — a bag hanging on a hook swings, and a swinging weight is worse than no weight. Rocks on the feet or a strap to the ground beat the hook.
An intervalometer or a locking remote release
This is the piece that actually makes the picture continuous. You need the next frame to start the instant the last one ends, hundreds of times, without touching the camera.
Assuming the in-camera interval timer is enough. Many of them insert a fixed pause, and some cannot be set below the exposure length. A cheap external intervalometer, or continuous drive with the remote locked down, removes the decision entirely.
Power
A dead battery at frame 200 leaves a permanent gap in every arc.
Cold. A battery that lasts all evening indoors will not. Bring several, keep the spares in an inside pocket, and use a grip or a dummy-battery power bank if the camera supports one.
A dew solution
A fogged front element does not announce itself. You find out at home.
Relying on the lens hood alone. It helps, and on a humid night it is not enough. A resistive heater strip on a power bank is the reliable answer; a chemical hand warmer rubber-banded to the barrel is the cheap one. Check the glass with a torch every half hour.
A fast card with room to spare
Four separate things put a gap in your trails: in-camera noise reduction, the intervalometer's own pause, the buffer clearing, and the card finishing the write. Only the last two are about the card, and they are the two nobody checks.
Filling it. The 380-frame night on this page is 18 GB of uncompressed RAW — work that out before you leave, not at 01:00.
A wide, fast lens
Wide gets sky and ground in one frame; fast lets you keep exposures short.
Shooting wide open and being surprised by the corners. Fast glass smears corner stars into little wings, and stacking cannot undo it — see why corner stars look like seagulls. A stop down usually fixes most of it.
A red torch, and something warm
You are going to be standing still in the dark for two hours.
Underestimating it. This is the most common reason a sequence ends early.
4. The settings
Three recipes, by how many of these you have done. They differ less than you would expect, because the sky
does not care how experienced you are.
Three starting points
First time out
You have done a few
Difficult sky
Mode
Manual
Manual
Manual
Shutter
30 s
20–30 s
10–20 s
Aperture
Widest, or one stop in
One stop from wide open
Wide open
ISO
800
800–1600
1600–5000
White balance
4000 K, manual
3400–4300 K, manual
3400–4300 K, manual
Interval
Shutter + 2 s
Shutter + 1 s
Shutter + 1–3 s
Frames
120 (one hour)
240–360
as many as the night allows
Format
RAW
RAW
RAW
Dark frames
skip them the first time
10–20 at the end, lens cap on
10–20 at each end
Why ISO is an aesthetic decision
ISO 800 is the most-quoted starting point in the published tutorials, and the reason it is a starting
point rather than an answer is that ISO trades star count against star colour. Push it and
more faint stars clear the noise floor, so the sky fills up — and the bright stars saturate toward
white, so Betelgeuse stops looking orange. Pull it back and you get fewer stars with more colour in them.
Several tutorials state the trade in opposite directions and both are right; they simply want different
pictures.
Trail brightness is decided per frame, not by the night
This one surprises people, and it follows directly from how the stacking works. A star-trail stack keeps the
brightest value each pixel ever had, not the sum of them. So adding frames makes your trails
longer and does nothing at all to make them brighter: the brightness of any
point on an arc is whatever the one frame that drew it recorded there.
Two consequences worth carrying outside with you. Aperture and ISO are your only brightness controls, and
they act on every frame equally, so a sequence that is one stop under is one stop under for four hours. And
a faint star that never clears the noise in a single 30-second frame will not appear in the stack however
many frames you take — which is the exact opposite of deep-sky work, where the whole point of adding
frames is to lift things that no single frame could show. If you want more stars in the picture, you change
ISO or aperture; if you want longer arcs, you stay out later.
This is also why the sky background does not average away. A maximum samples the top of the noise at every
pixel instead of the middle of it, so the raw background gets noisier as frames accumulate. Fighting
that is a job for the stacker, not for the camera —
per-frame sky equalisation is what does it.
The number nobody publishes: duty cycle
Every guide tells you to keep the gap between frames short. None of them tells you what "short" means,
because the answer depends on the frame length. The useful figure is
shutter-open time divided by the interval.
The same two-second gap, at three frame lengths
Exposure
Gap
Duty cycle
Result
4 minutes
2 s
99.2 %
Invisible.
30 seconds
2 s
93.8 %
Fine at normal viewing sizes.
15 seconds
2 s
88.2 %
Visible at 100 % on a long arc.
15 seconds
15 s
50 %
A dashed line. This is what one tutorial actually recommends.
Above 90 % you can stop thinking about it. Below it, duty cycle stops being the whole answer and the
question becomes how far the sky moved during the gap in pixels, which depends on your focal length
and where in the frame you are looking — the example night below sat at 81 % and still drew
continuous arcs, because three seconds at 24 mm is less than a pixel.
The arithmetic that turns a gap in seconds into a gap in pixels is a
page of its own. A good stacker can close small gaps afterwards, but it can only interpolate across what you
did not record.
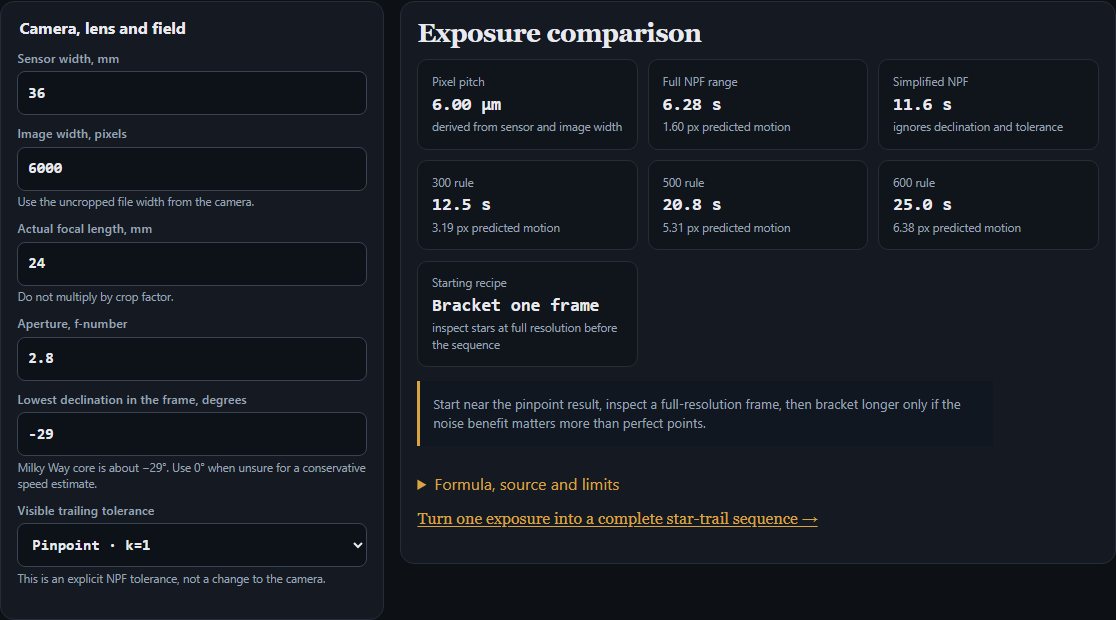
The Milky Way exposure calculator exists to answer the
opposite question — how long you can expose before stars stop being points — and it is worth a
look anyway, because it shows what each rule means in pixels on your own sensor. For trails you want to be
on the wrong side of every one of those numbers.
What to switch off, and why
Six settings that quietly ruin sequences
Setting
State
What happens if you leave it
Long-exposure noise reduction
Off
The camera shoots a second dark frame of equal length after every exposure and subtracts it. Your 30-second frame now occupies 60 seconds, the duty cycle halves, and the trails dash. This is the single most common cause of dotted trails.
Auto ISO
Off
Brightness steps between frames, and the stack shows the steps.
Auto white balance
Off
Colour drifts across the night. The stack combines the drift into the sky.
Image stabilisation
Off
On a tripod a stabiliser hunts for movement that is not there and adds its own.
Autofocus
Off, after focusing
The camera refocuses on nothing in the dark and you lose the rest of the sequence.
In-camera lens corrections
Off if offered
A baked-in geometric correction resamples the frame, which is exactly the wrong thing to do to a one-pixel star before stacking.
Focusing, which is where nights are lost
Switch to manual focus, point at the brightest star you can find, magnify it as far as live view goes, and
turn the ring until the dot is as small as it will get. Then nudge past and come back, so you know you found
the minimum rather than a plateau. Two checks worth making: confirm the dot is a star and not a hot pixel by
watching whether it changes size as you turn the ring — a hot pixel will not — and do not trust
the engraved infinity mark, because most modern lenses focus past infinity by design and the mark is not a
stop. Once it is right, tape the ring.
If your foreground is close enough to matter, you have a genuine conflict, and the honest answers are either
to focus at the hyperfocal distance and accept slightly softer stars, or to shoot the foreground as a
separate frame at a different focus and blend it. There is no setting that resolves it.
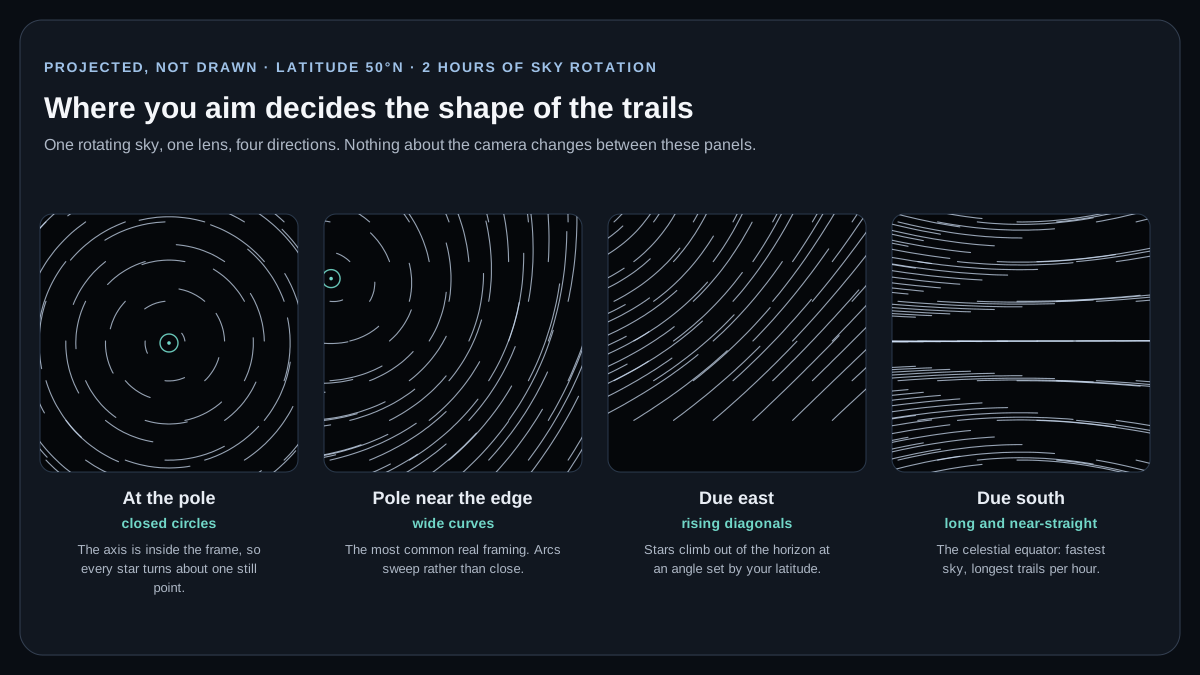
This is the compositional decision, and it is entirely determined by geometry. The sky turns about one axis;
where that axis sits relative to your frame decides the shape of every arc in it.
The same sky, four aims. Nothing about the camera changes between these — only which part of a
rotating sphere is inside the frame.
Aim, and what you get
Point at
Shape
Trail length
Good for
The celestial pole
Concentric circles about a still centre
Shortest near the centre, longest at the edges
The classic vortex. Needs the pole comfortably inside the frame.
Just off the pole
Wide sweeping curves that do not close
Medium
The most common real framing, because the pole is rarely where the landscape is.
East or west
Diagonal lines rising or falling
Long
Motion and direction. Stars rise in the east and set in the west, which reads as going somewhere.
The celestial equator, due south from the north
Near-straight parallel lines
Longest of all
Graphic, minimal compositions. This is the fastest-moving part of the sky.
Finding the pole, in both hemispheres
In the north, extend the line from Merak through Dubhe — the two stars at the end of the Plough's bowl
— about five times, and you land on Polaris. Polaris sits about 0.7° from the true pole, which is
invisible at any wide-angle focal length and only matters if you are polar-aligning a tracker.
In the south there is no useful pole star. Sigma Octantis is within about a degree of the pole but shines at
magnitude 5.5, which is barely naked-eye at a dark site and hopeless anywhere else. Southern shooters use
geometry instead: extend the long axis of the Southern Cross, from Gacrux through Acrux, by about four and a
half times its own length — roughly 27° — and cross-check it against the perpendicular bisector
of the line joining Alpha and Beta Centauri. Where the two lines meet is the pole. The practical consequence
is that the hub of a southern vortex is genuinely empty; there is no bright anchor star sitting in the middle
of it.
The pole's altitude equals your latitude. That is exact, not an approximation.
Where
Latitude
Pole sits
Consequence for framing
Tromsø
~70°N
~70° up
Nearly overhead. Full circles are easy; getting ground in the same frame is not.
Edinburgh
~56°N
~56° up
High. Circles sit well clear of the horizon.
Berlin
~52°N
~52° up
The classic European look.
New York
~41°N
~41° up
Circles centred halfway up the northern sky.
Los Angeles
~34°N
~34° up
Low enough to place the hub over a landscape feature.
Tenerife
~28°N
~28° up
Low. Part of the circle is cut off by the horizon.
Singapore
~1°N
on the horizon
Nothing is circumpolar. Every star rises and sets in near-parallel arcs.
Sydney
~34°S
Polaris never rises
The south celestial pole is ~34° above the southern horizon.
The ground under the sky
Every tutorial in the survey that discusses composition says the same thing, and they are right: arcs alone
are not a photograph. A tree line, a ruin, a lone building, a ridge — something with a recognisable
edge gives the circles a scale and a reason. Roughly seventy per cent sky is one stated ratio; the real rule
is that the foreground should be worth looking at on its own.
If you want to light it, do it on the first frame and the last frame only, at low power, from off to one
side. A lighten stack keeps the brightest value at every pixel, so lighting one frame lights the whole
picture — and lighting all of them makes the foreground look like a film set.
6. One real night, measured
Everything above is what people recommend. This is what one sequence actually was, read out of the RAW files
themselves rather than remembered. Every one of the 380 frames was shot at 15 seconds, f/1.6 and ISO 5000,
and the sequence ran from 00:33:32 to 02:30:02 on 13 August 2026.
13 August 2026, a field in rural Europe
Fact
Value
Note
Camera and lens
Sony A7C, 24 mm f/1.4
Full frame, 24 MP
Exposure
15 s at f/1.6, ISO 5000
Identical on every frame sampled across the night
Frames
380
Started / ended
00:33:32 → 02:30:02
116 minutes 30 seconds on site
Shutter open
95 minutes
380 × 15 s
Interval
18 s
277 of 379 intervals exactly 18 s, 90 at 19 s
Gap
3 s
Duty cycle 81 %
Sky rotation
29.2°
116.5 minutes at 15.041°/h
Pixel scale
50.8 arcseconds per pixel
35.6 mm across 6024 pixels at 24 mm
Star movement per frame
4.4 pixels
At the celestial equator, in 15 seconds
Two things about that table are worth arguing with, and both are deliberate.
15 seconds and ISO 5000 sit outside the tutorial consensus, which is 30 seconds at
ISO 800. Short bright frames are a legitimate trade: you lose star colour and gain resilience, because
a car headlight or a gust ruins fifteen seconds rather than a minute. At f/1.6 under a light-polluted sky
the background is already the limiting factor well before 15 seconds, so a longer exposure would mostly have
collected more town glow. It is not the recipe to start with; it is a defensible answer to that particular
field.
An 81 % duty cycle is lower than it should be. Three seconds is a fifth of a 15-second
frame and a twenty-fifth of a 75-second one, so short frames pay five times over for the same pause. The arcs
came out continuous anyway,
because a 3-second gap at this focal length is under a pixel of sky movement near the pole and about
0.9 pixels at the equator — which is the whole point of doing the arithmetic instead of guessing.
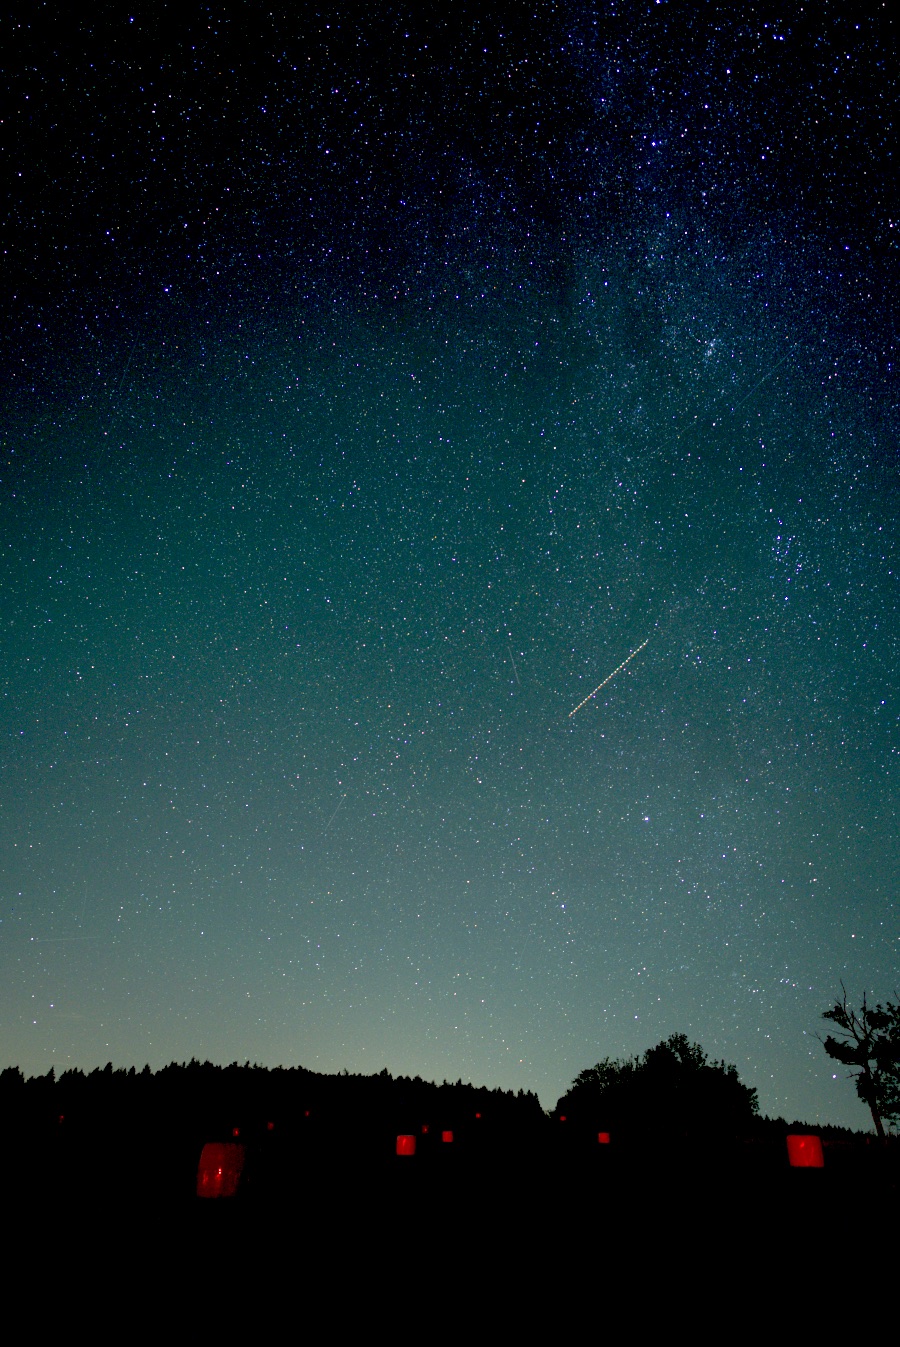
One frame of the 380. Pinpoint stars, a teal cast from the towns, and — already, in a single
15-second exposure — one straight artificial streak across the middle of the sky.
7. The lines that are not stars
This is the part of star-trail photography that has genuinely changed in the last five years, and no tutorial
written before about 2021 accounts for it.
Jonathan McDowell's satellite catalogue counted 12,881 Starlink satellites launched and 11,093 still in
orbit on 31 August 2026
(Planet4589),
and Starlink is one constellation among several. CelesTrak put the total tracked population at about 35,000
objects on orbit in early September 2026.
Published forward plans across all announced programmes run to well over a million objects. These numbers go
stale quickly and are worth checking rather than quoting.
The measured consequence is not speculative. The SPHEREx mission analysed about 6,000 exposures collected in
2025 and found that 73 per cent of them already carried a satellite trail, averaging 2.18 trails per exposure
(Borlaff et al., 2026). That
measurement matched the prediction made in advance of it, which is the part worth worrying about: the models
forecasting a worse sky are working correctly. A study of two decades of Hubble images found 2.7 per cent of
its individual exposures crossed, at a typical exposure length of eleven minutes
(Kruk et al.,
2023), and the Rubin Observatory expects around a tenth of all its images to carry a trail.
Telling one from the other in your own frames
Aircraft, satellite and meteor, in a single frame
Aircraft
Satellite
Meteor
Structure
A solid line flanked by dashes — steady lights draw the line, strobes punch the beads
One continuous streak, no beading
One streak, in one frame only
Colour
Coloured: red port, green starboard, white strobes
Neutral white or blue-white — it is reflected sunlight
Often coloured, varies
Brightness along it
Pulsing and uneven
Ruler-flat
Brightens, peaks, fades
Ends
Usually edge to edge
Often begins or ends abruptly mid-frame, where it entered the Earth's shadow
Tapers at both ends
When
All night, wherever people fly
Concentrated in the hours after dusk and before dawn
Unpredictable; more in showers
There is a fourth thing you will see and it is not in that table, because what identifies it is timing rather
than shape. A tumbling satellite can catch the sun on a flat surface and flash: a bright dot or short dash
that exists in exactly one frame. The test that separates a glint from a hot pixel is to look at the frames
either side — a hot pixel sits at the same place on the sensor every time, and a glint happens once, at
a position in the sky.
The beading has an exact cause. Aviation regulations require an anti-collision light with an effective flash
frequency of not less than 40 and not more than 100 cycles per minute
(14 CFR 25.1401),
which is about once a second. At one flash per second, a 30-second frame records roughly thirty separate
bright beads along the aircraft's path. In a lighten stack,
where the brightest value at each pixel wins, every one of those beads is welded permanently into the
finished picture.
Which is worse depends on where you stand. On 23 July 2026 Flightradar24 reported tracking 153,359 commercial
flights in a single day, a record, and 287,364 flights of every kind
(Flightradar24). Aircraft fly all night and they fly
where people live, which is where most readers of this page will be standing. Satellites are concentrated at
dusk and dawn but they are everywhere, including the dark site you drove three hours to reach, and their
numbers are growing much faster than air traffic. Aircraft are the bigger nuisance today, near people.
Satellites are the bigger problem on trend.
What the usual fixes cost
Sigma clipping — discarding the outlier bright samples at each pixel — does
remove satellite trails, and it removes your meteors with them, because a meteor is statistically identical
to the thing you are rejecting. Gap filling in a trail stacker bridges missing time
between frames; it was never designed to delete an intruder and will not. Content-aware fill
invents arcs that do not follow the concentric geometry of the real ones, which is visible the moment anyone
looks closely.
The approach that keeps the sky is to find each straight track by measuring it, then repair its footprint
from a neighbouring frame in which the same patch of sky was not crossed. What replaces the line is not
painted or interpolated — it is what the camera itself recorded one frame earlier or later.
How that measurement works, and where it declines to act is
its own page.
Here is what that came to on the night at the top of this page. The stacker's own straight-line search was
run over the 380 frames at the sensitivity it ships on, with nothing overridden:
309 of the 380 frames carried at least one straight track, 739 tracks were found in total,
and 488 of them were removed automatically. Not one was refused because the repair could not reach it. The
other 251 were flagged for review rather than deleted, which is the tool declining to act on its own
evidence: the more frames a track appears in, the more likely it is something you meant to keep.
Straight-line removal off. One bright diagonal cuts across the arcs from corner to corner, and a fainter
one crosses the top left. The tool measures the line; it does not claim to know whether an aircraft or a
satellite drew it.
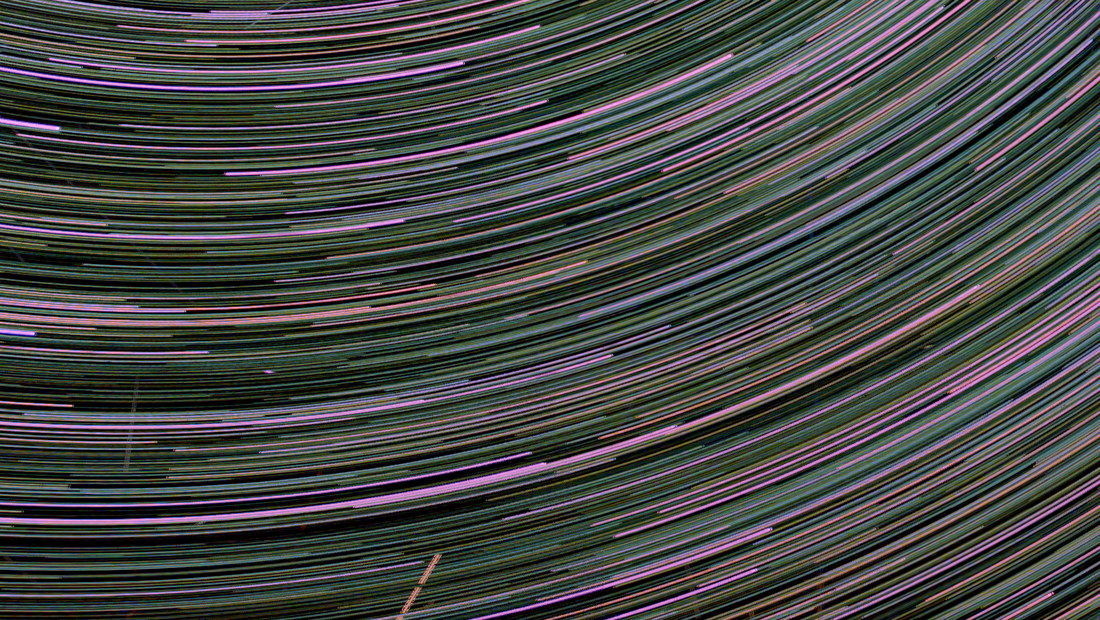
The same 380 frames were stacked twice with only the straight-line removal changed, and one pair of
brightness levels was applied to both, so this is a comparison rather than two different edits. The
diagonal is gone and the arcs run unbroken through where it was, because what replaced it is the same
patch of sky out of frames that were not crossed. A short residual is still visible near the bottom edge,
and that is the point: it is one of the 251 the tool flagged rather than deleted.
8. What happens to the folder afterwards
Stacking star trails is conceptually simple: for every pixel, keep the brightest value any frame recorded
there. A star that moved across the frame is bright somewhere new in each frame, so the maximum draws its
whole path. That operator is called lighten, or maximum, and it is why star trails are the easiest kind of
stacking to do badly and hard to do well.
Two things it does that nobody mentions. It keeps every bright intruder, perfectly, for the same
reason it keeps the stars. And because it samples the upper tail of the noise at each pixel rather than
averaging it away, a plain maximum makes the sky background noisier as you add frames, not cleaner
— the opposite of what stacking does everywhere else in astrophotography. Equalising each frame's sky
level before taking the maximum is what stops a brightening cloud or a rising Moon from winning the whole
picture. Why a plain lighten stack loses your faintest trails has the
measurements.
Being precise about this is the point of the section, because "straight out of camera" is claimed constantly
and almost never true.
The finished stack on this page
Done
Not done
380 RAW files decoded, demosaiced and white-balanced with the gains the camera itself recorded
No conversion from the camera's colour primaries to sRGB. The stacker stops at white balance on purpose, and this is where the magenta comes from.
Combined by lighten, with the straight-line search doing its default job
No sky replacement, and no foreground photographed at another time or place.
One black and white point chosen automatically across the whole frame
No colour grading, no saturation or vibrance, no split toning.
Resized for the web and saved as JPEG
No noise reduction, no sharpening, no star reduction, no composite of any kind.
The result is a magenta-leaning sky, visible noise in the shadows, and hay bales lit an unglamorous red by
somebody's torch. All of that is real, and the cast in particular is a decision rather than an accident: a
camera's own colour primaries are not sRGB, and converting between them takes a second transform that would
sit underneath any judgement you later made about star colour. A finished print would neutralise the cast in
about four minutes in any raw editor, and you should — but then it would be a picture about editing,
and the numbers on this page would be describing something else.
10. The tutorials, and where they disagree
Twenty-four published guides to star trails were read for this page: photography tutorials, magazine
features, two manufacturer pages and the documentation of two stacking programs. Fourteen of them give
concrete numbers, and those are below, so you can see the spread rather than take one recipe on trust.
Every figure in the table was read from the source's own page, and the two positions this page calls wrong
were each re-checked against the original before it said so.
The 15-second recommendation contradicts its own next sentence and would put you at 50 % duty cycle. Aim above 90 %.
Long-exposure noise reduction
Off — eight sources, with the mechanism spelled out
On — one manufacturer page
Off, when stacking. It is defensible only for a single multi-hour exposure, which is a different technique.
Frame length
20–60 s, thirteen sources
3–5 minutes, three sources
Both work. Total elapsed time makes the arc, so 100 × 30 s and 50 × 60 s draw the same trail. Short frames lose less when something goes wrong.
Weighting the tripod in wind
Hang your bag from the centre hook
Never do that in wind — it swings
The second. Add weight low and rigidly, or strap the tripod down.
ISO
Low, for star colour
High, for star count
Not a technical dispute. Decide which picture you want.
Focusing method
Magnify a star in live view
Use the hyperfocal distance instead
Live view on a star for sky-dominant frames; hyperfocal only when a near foreground has to be sharp in the same exposure.
Three claims that recur and are simply wrong: that long-exposure noise reduction only affects JPEGs (it is
dark-frame subtraction applied to the raw data, and it doubles frame time regardless of format); that you can
set focus by the engraved infinity mark (most modern lenses focus past it); and that focus is best judged by
minimising chromatic aberration (colour fringing does not vanish at best focus).
Star-trail questions people actually ask
How long do I have to shoot for a decent star trail?
An hour draws a 15° arc, two hours 30°, four hours 60°. An hour is the usual floor and most published tutorials ask for 90 minutes to two hours; the arc length depends only on how long the sequence ran, not on your exposure, aperture or ISO.
What shutter speed should I use for each frame?
Thirteen of the twenty-four tutorials surveyed here include 30 seconds, and 20 to 60 seconds is the defensible range. Shorter frames at a higher ISO also work and are what our own example night used; what matters is that the frames run back to back, because total elapsed time makes the arc.
Why do my star trails come out dotted instead of continuous?
The sky keeps turning while the shutter is closed, so every gap between frames is a missing piece of arc. The number to watch is duty cycle — shutter-open time divided by the interval. In-camera long-exposure noise reduction is the usual culprit because it doubles the time each frame occupies.
Do I need a dark sky for star trails?
Less than for the Milky Way. Star trails are made from bright stars, and a stack with per-frame sky equalisation copes with a raised background that would erase faint structure. A darker site still gives more stars and better colour, but a Bortle 4 field is a perfectly good place to start.
What ISO should I use?
ISO 800 is the most-quoted starting point across the tutorials surveyed. Higher records more stars and washes star colour out; lower keeps colour and records fewer stars. It is an aesthetic decision more than a technical one, and it is the setting to change when the sky is bright with moon or town light.
One long exposure or many short ones?
Many short ones. Every guide surveyed here that discusses both prefers stacking, for three reasons they state repeatedly: the sensor heats up over a long single exposure, one ruined frame does not cost you the night, and the same sequence is a time-lapse for free.
How do I get the aeroplane and satellite lines out?
Not by sigma clipping, which deletes your meteors along with them. Find each straight track and repair its footprint from a neighbouring frame that was not crossed, so the sky underneath is recorded rather than painted. Starting an hour after dusk also removes most satellite passes for free.
Which white balance should I set?
Set it manually somewhere between about 3400 K and 4300 K, which is where every numeric recommendation in the surveyed tutorials overlaps, and then leave it alone. The exact number matters less than every frame sharing it, because the stack combines them and auto white balance will drift across the night.
If you only remember five things
Time makes the arc. An hour is 15°. Nothing else you set changes that.
Turn long-exposure noise reduction off. It is the usual reason trails come out dotted.
Fix everything and touch nothing. Manual exposure, manual focus, manual white balance,
and hands off the camera until it is finished.
Start an hour later. You lose an hour of arc and most of your satellite passes.
Put something in front of the sky. Circles on their own are a diagram.
Then bring the folder back
The stacking runs in this browser tab. Nothing is uploaded, nothing is installed, and the finished screen
says how many frames went in, what was left out, and which straight lines were found and what happened to
each of them.